Over time, you will have new content to share on your website. When you create a new page, make sure it can be found by users by adding it to the sidebar and primary navigation.
In most cases, this new page will fit within a section of pages that already exist on your site. Throughout this article, we’ll walk you through how to add your page to the navigation so users can easily find it.
If you’d like tips on building out pages that fit within your website structure, head on over to our Common Website Structures for Nonprofits guide.
Helpful Terminology
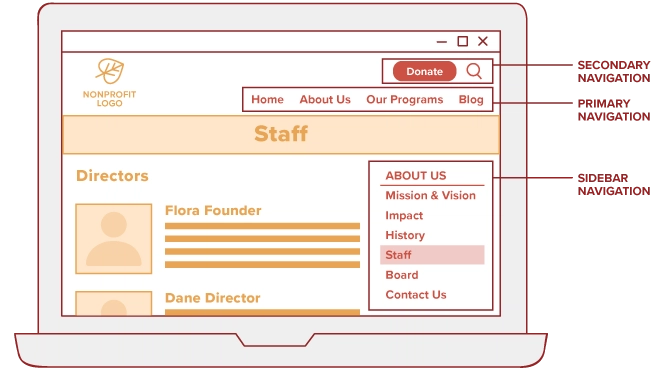
- The primary navigation is made up of the pages that show along the top (or “header”) of your website. It can also be called your main navigation.
- A parent page is usually a core page that’s featured in your primary navigation. Your more descriptive and specific pages will usually be placed under a parent page to break your content into logical buckets.
- A subpage, sometimes referred to as a child page, is nested underneath a parent page in your website structure.
- The sidebar is an area of a page that is for displaying information that is not part of the main content. The sidebar is usually a vertical column on the right side of the page.
Tips & Best Practices
- A page should only appear in one place in your navigation. Listing your page in multiple sections, like About Us and Our Programs, is confusing to visitors.
- Be sure to add links to your new page from other pages. This helps visitors naturally find the new page (and search engines like it, too). Learn about creating helpful links.
Setting a Parent Page
After you are finished formatting your page content and before you publish your new page, consider where this information will fit best within your website structure. If your new page will be a subpage to provide more specific information about a larger element of your organization, you should set a parent page.
In the Document settings on the right-hand side of the screen, scroll down and find the Page Attributes section. Select the Parent Page from a dropdown list of all of the existing, published pages of your website.
Once that change is made, you’ll see that the page link will be updated to indicate how your new page fits within the overall structure of the website.
For example, if you’re adding information about your history and set the parent page to About, the page link will change to: https://airy.wiredwebsites.org/about/history
Once you’ve set a parent page, you can save the page as a draft or publish it. If a parent page is not set, the new page will automatically become a top-level page.
Updating the Sidebar Navigation
By setting a parent page, your new page will automatically be shown in the sidebar navigation. You’ll see it listed in the sidebar of every page within that section of your site. But, you might want to adjust the order in which it’s shown so your new page is in a logical spot. For example, if you add a page about your board members, you might want it to be listed right below your staff page.
Visit the Pages section and find your new page. It should be listed close to the parent page you set up. Next, drag and drop the page so it is ordered correctly within the other subpages. This update to the page order will be automatically saved.
Show More Pages in the List
If you have a large site, you may need to adjust the number of pages you see on one page before you reorder them.
When you’re in the Pages section, select the Screen Options tab in the upper right. Under Pagination, increase the number of items per page.
Check Your Work
Take a look at your new page. When you do, you should see that the sidebar navigation shows your new page in the order you set up.
You can also set up sidebar calls to action (CTAs) below the navigation on each page, which help your users engage with your related website content or take certain actions.
Add, Remove & Reorder Pages in Your Menus
It’s important to add your new page into the primary navigation. This means that your page will show up in the dropdown menus when a user is exploring the pages listed at the top of your website. It also allows the page to show up in the condensed version of the navigation that visitors see when they use a phone or tablet to look at your website.
You can manage your site’s primary navigation using the Customizer. This includes adding, removing and reordering pages in the menu.
- From the Dashboard, choose Appearance then Customize.
- Select Menus and then choose the specific menu you’d like to adjust.
- You’ll see a list of pages in the menu, with options to reorder and add items.
- To add an item to the menu, click the Add Items button at the end of the list. Select a page, post or other type of website content by clicking on it.
- Reorder pages by clicking and dragging pages. Alternatively, click the Reorder link at the bottom of the list and use the arrows that appear for each item.
- When you click on an item in the list, you’ll see more details for that page.
- Change a page’s Navigation Label if you want to alter how the page name appears in the menu, like shortening the wording or using an ampersand (&). This does not change the page name, only how it appears in the menu.
- To remove a page from the menu, click the red Remove text at the bottom of the window.

Once you’re done making changes to the menu, be sure to click the blue Publish button to implement on the live site.
Still Have Questions?
The quickest way to get support is to reach out to us within your website’s admin dashboard. Log into your website and then fill out the Request Help form. You’ll hear back from us within one business day.