Every now and again you’re going to want to refresh the content on your homepage. And we get it… it can be hard to remember where to change every little detail. In this post, we’re outlining exactly how to update all of the content on your Scholar theme homepage. If you’re not using the Scholar theme, check out how to adjust the homepage content in other themes.
To revise anything on your website, you’ll first need to be logged in to access the back end of your site. Use the labeled photo for reference and the bulleted list of links below to find instructions for how to revise each specific section you’d like to update on your homepage.
It’s worth noting that there are many sections you can choose whether or not to display, making the Scholar homepage very customizable. However, you won’t be able to change the order in which the sections appear.
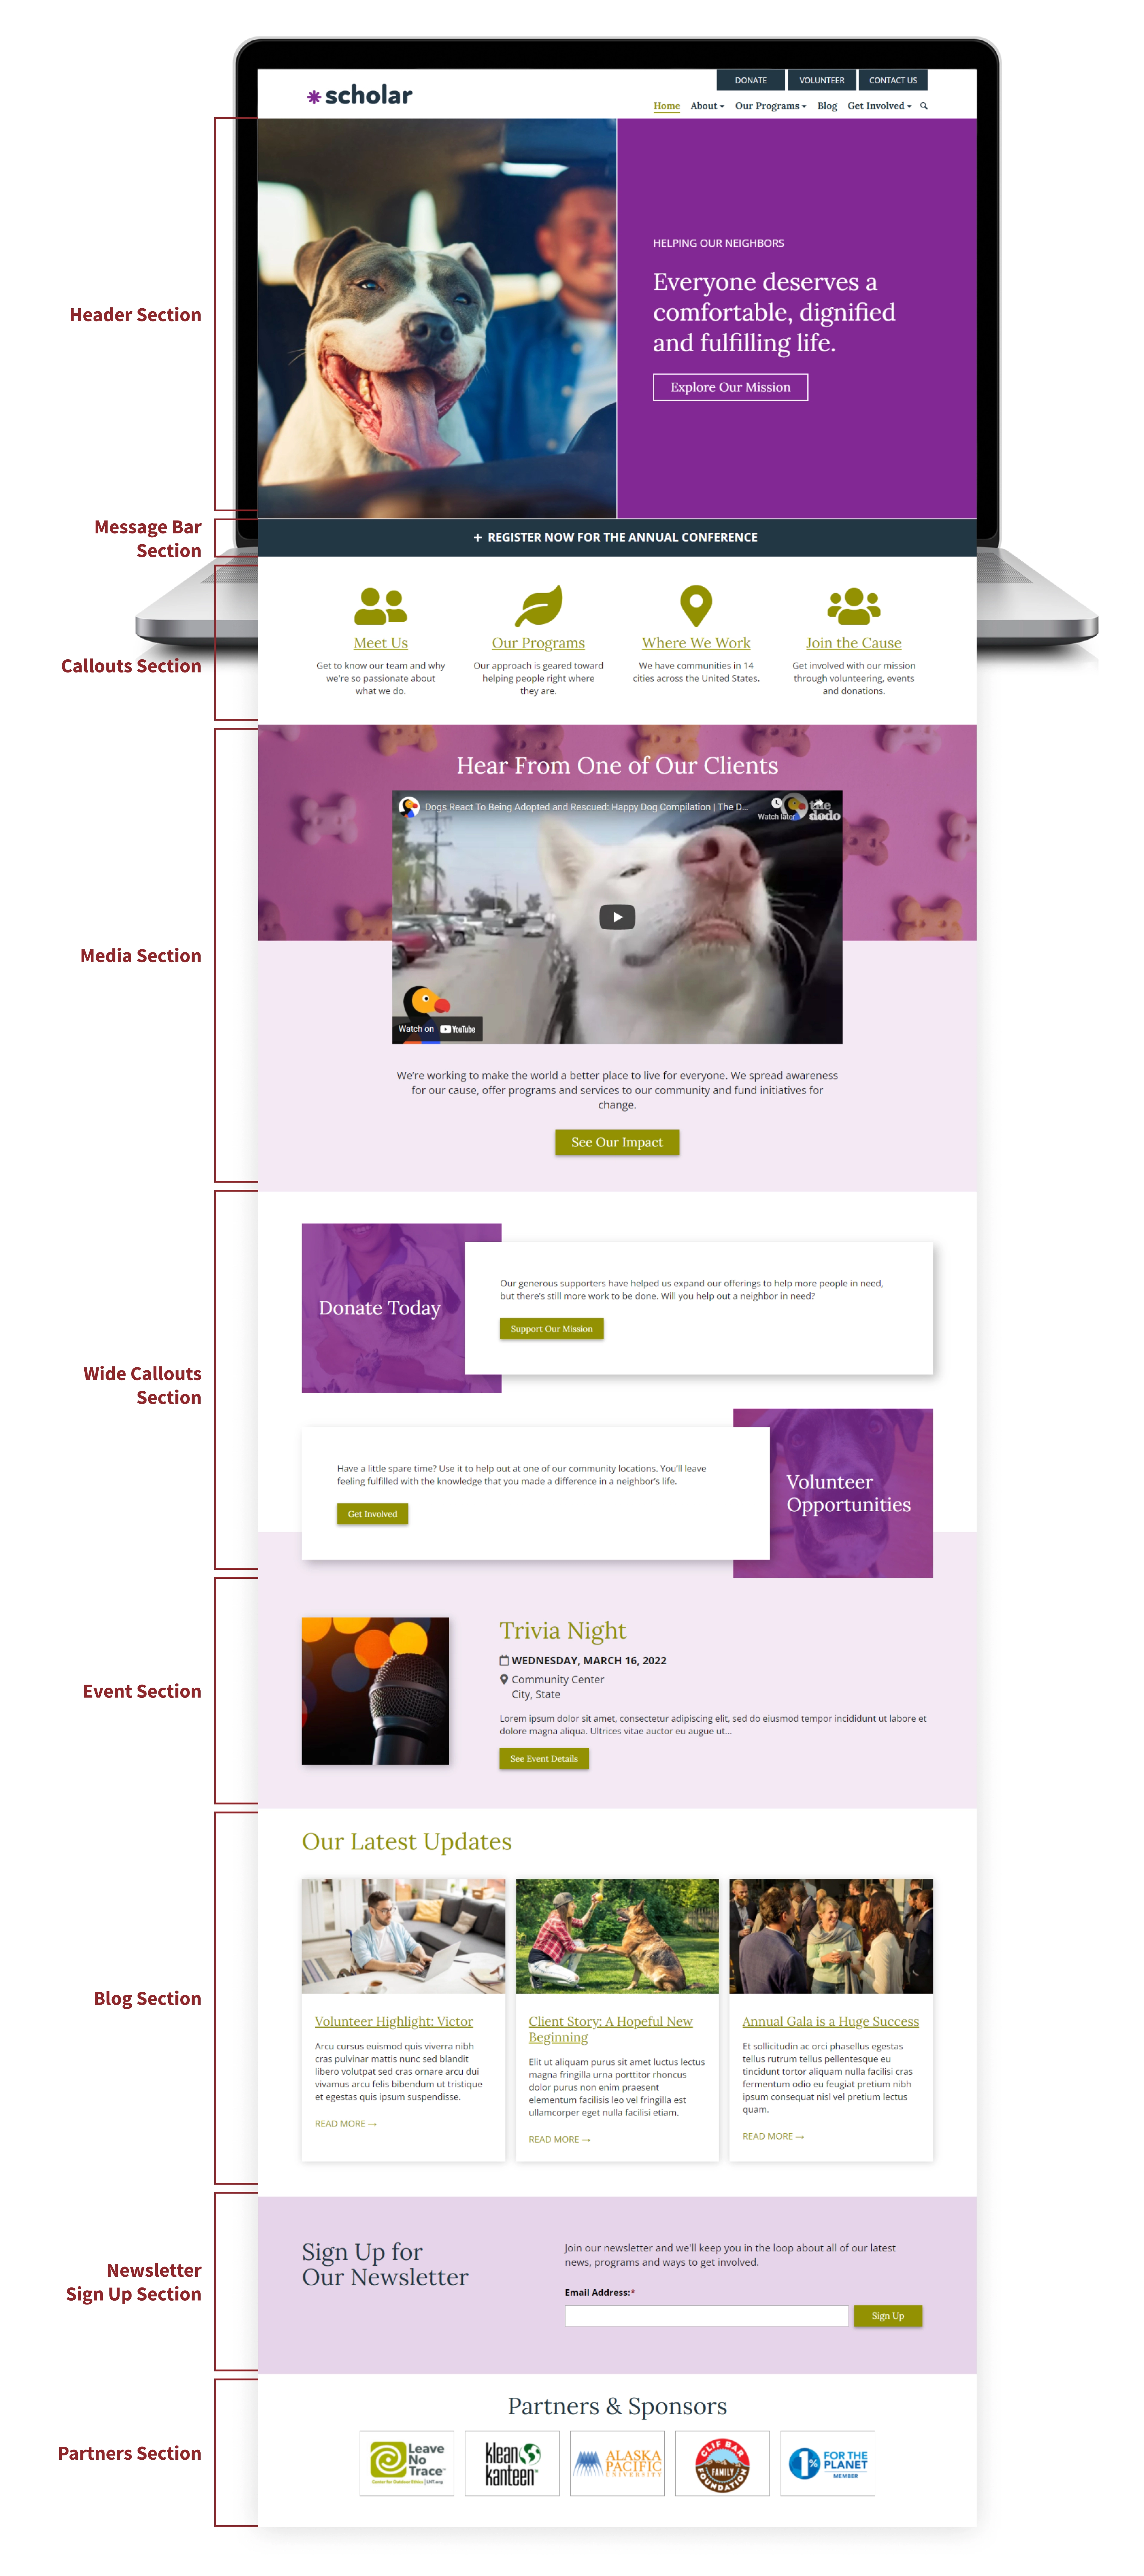
Edit the Header Section (Image and Text)
The Header Section includes the large image you see on the left side of your screen as soon as your homepage loads, as well as the section to the right with the large text.
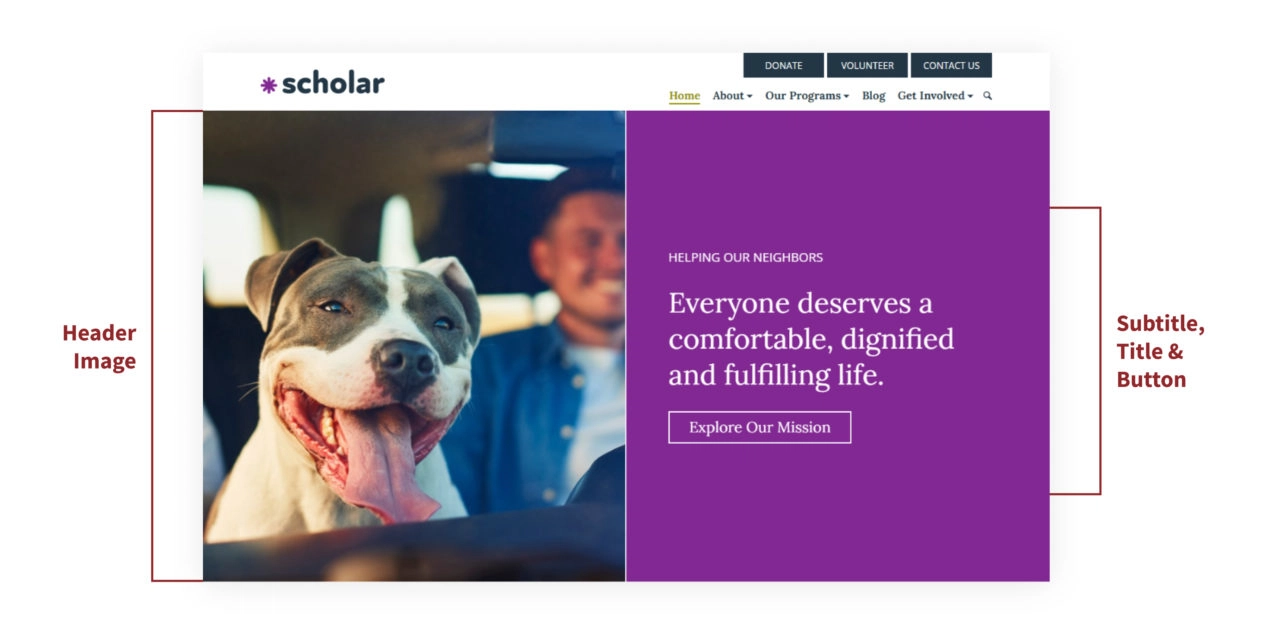
Change the header image
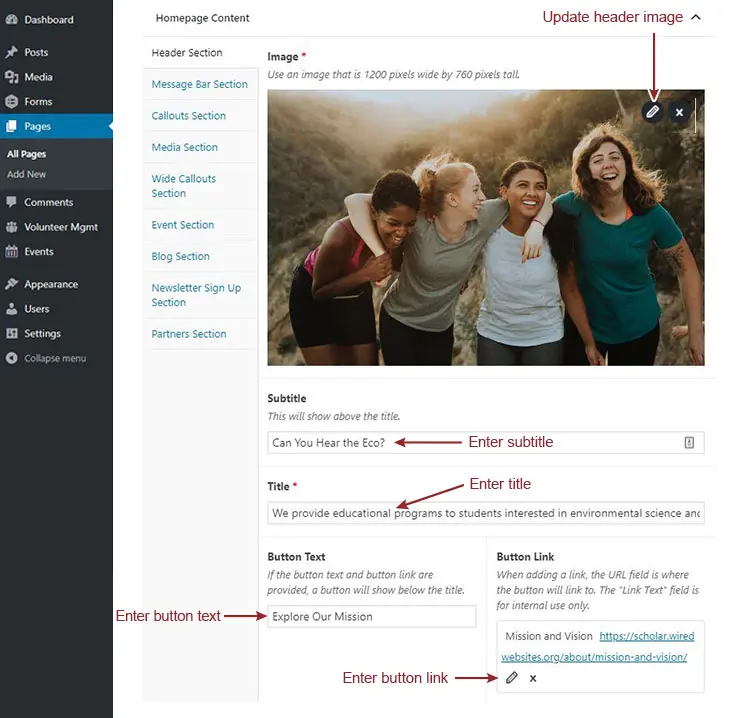
You can swap out your header image by first cropping a photo at 1200 pixels wide x 760 pixels tall. Upload it to the section labeled “ Image” in the back end of your website in the “Header Section” tab of the homepage.
- Hover over the current image in the back end and click on the “x” in the upper right hand corner to remove the existing image.
- Click the new ”Add Image” button that has shown up.
- Drag the new desired homepage hero image into the upload box.
- Don’t forget to add an Image Title and Alt Title.
- Click the “Update” button on the upper right corner of the screen before closing out.
Change the header text
You’ll notice the large, stacked text to the right of the header image with a solid color background. These pieces of copy are completely customizable in the back end of your homepage. Update this text by filling in the appropriate fields in the Header Section tab.
- The Subtitle text is the smaller text that shows above the main title. This text is optional.
- The Title text is the large text that appears in between the subtitle and button. This text is required, and can be your mission statement or primary tagline. Either way, it should give users a clear idea of what you do immediately when they land on your homepage.
- The Button Text and Button Link are optional, and should be filled out if you’d like to link people to another page front and center. We suggest that this call to action drive visitors to learn more about you and engage in a meaningful, broad way.
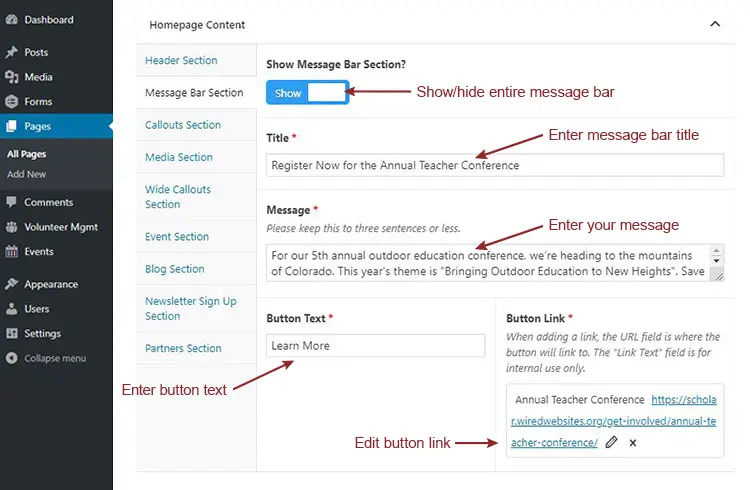
Edit the Message Bar Section
The Message Bar is an expandable section right below the main Header Section. This section can be used to highlight a more specific call to action, such as an upcoming event registration or a recent news announcement. This option is located in the second tab in the back end of your homepage.

- This section is completely optional, and can be turned on or off using the toggle at the top of the Message Bar Section in the back end of your homepage.
- You’ll need to give the section a title, as well as some message copy.
- A button is also required in this section, since it’s meant to be a prominent call to action. Be sure to add your button text and link, then click the blue Update button when you’re ready to save your changes.
Update the Callouts Section
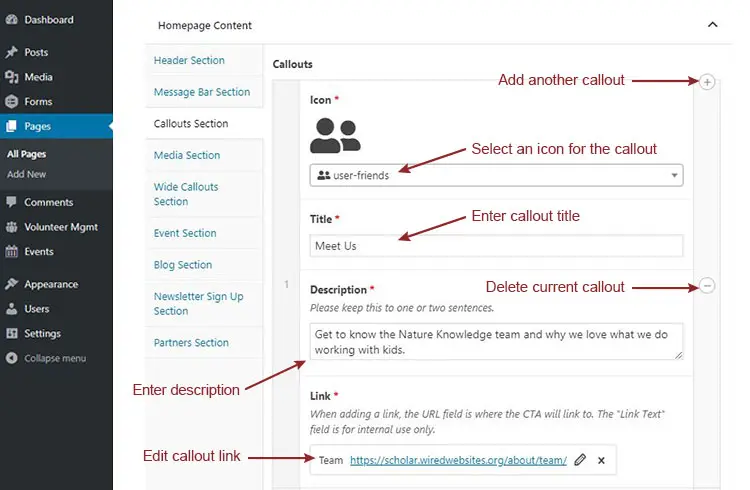
The Callouts Section is the third tab option in the back end of your homepage. This section is required, but allows you to highlight from one to four columns. This is a great place to highlight a few big ticket pages on your site, like your About page, Programs page, and Get Involved landing page.

- Use the + and – icons in the gray bar on the right side of the of the Callouts section to add or remove callouts.
- Using the dropdown menu, select an icon for each callout.
- Enter a short title into each Title field.
- Add a description to each callout explaining where you’re sending users.
- In the Link section, choose a page of your site for each callout to link.
- Click the Update button to see the changes you’ve made.
Revise the Media Section
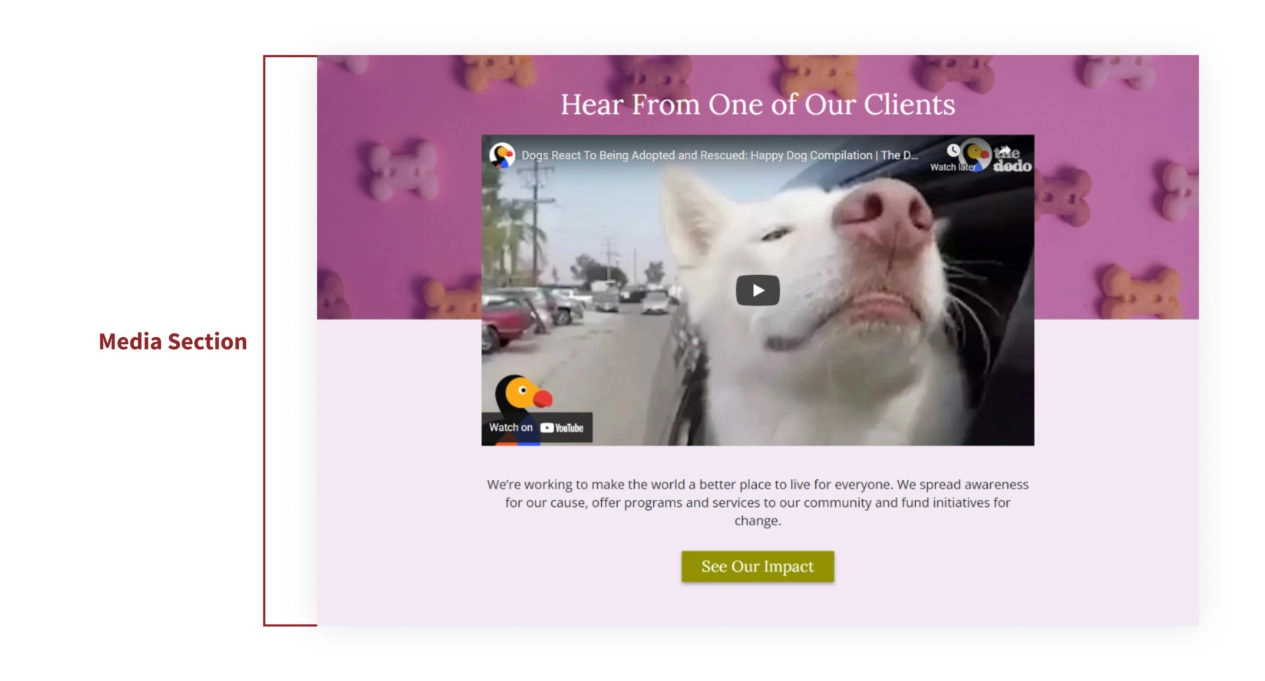
The Media Section is the fourth tab down on the Homepage in the back end. This optional section is a great place to highlight a video about your organization or nice large image of your nonprofit at work, accompanied by some descriptive text and an optional button.
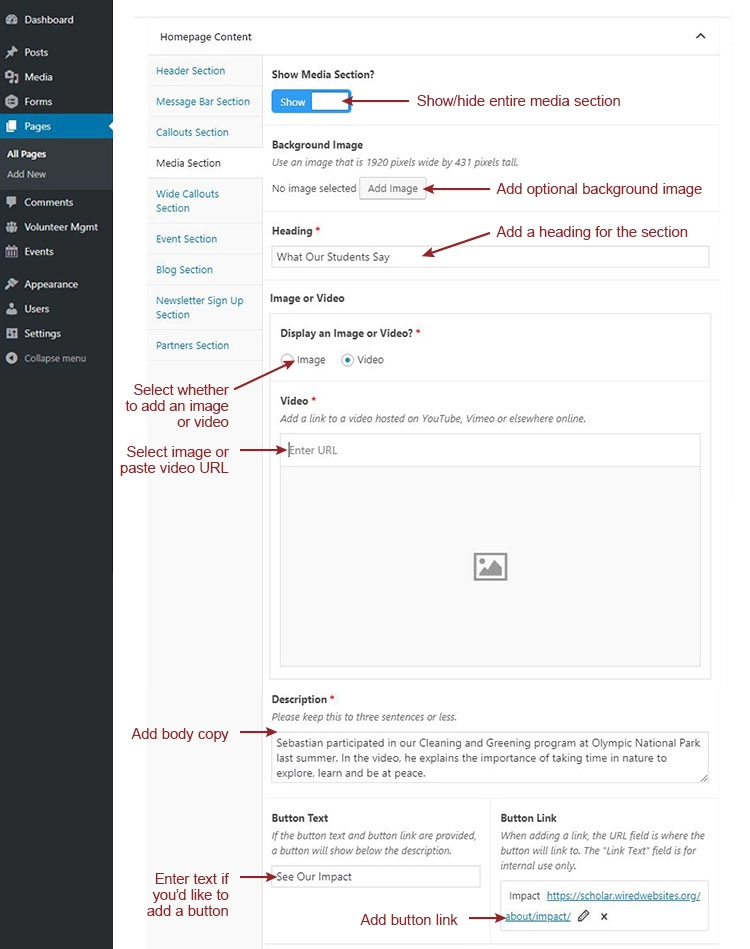
- Click on the Show/Hide toggle at the top under “Show Media Section” to activate or deactivate the section on the front end. If you decide to display this section, a heading, image or video file, and content text are required.
- You can add a background image if you’d like to jazz up the background behind your media. The background image will show up behind the top half of the section.
- Input a heading into the section called “ Heading.”
- Select whether to show an image or a video using the radio buttons under the “Show an Image or Video?” section.
- If you opt to show an image, upload or select an image file that’s 856 pixels wide by 407 pixels tall. If you opt to show a video, paste the video link in the form field.
- Enter your descriptive copy into the field called “Description” to explain your video or call to action in more detail.
- If you’d like to add a button to your content, fill out the “Button Text” and “Button Link” sections.
- Click the blue Update button in the top right corner of your screen to save your changes.
Update the Wide Callouts Section
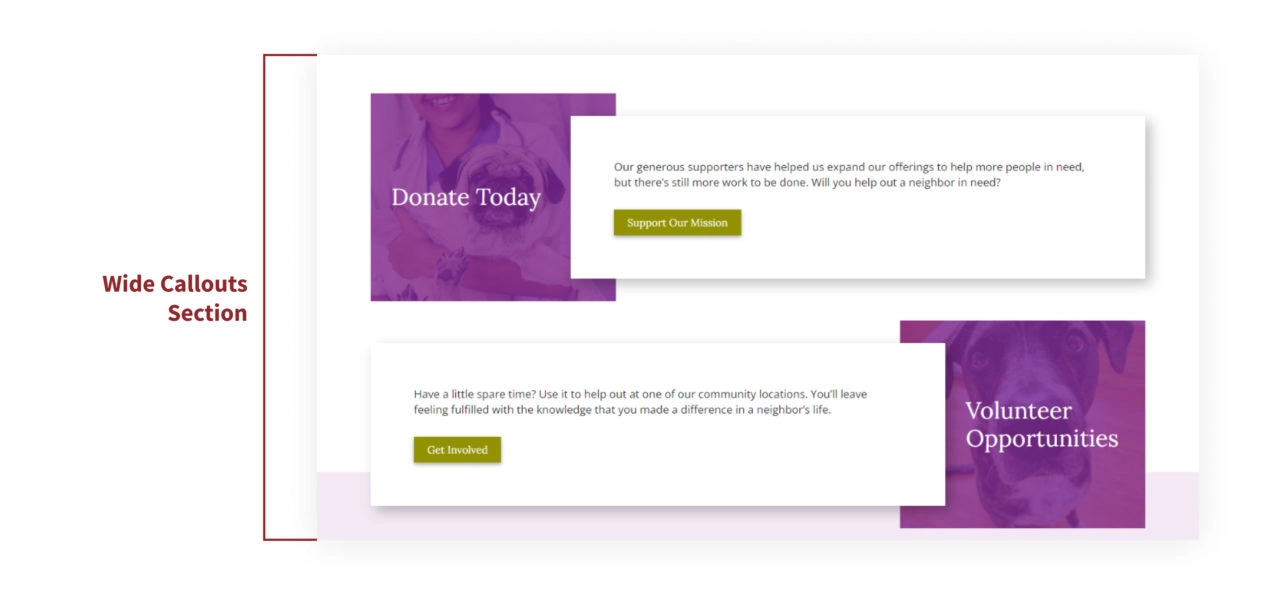
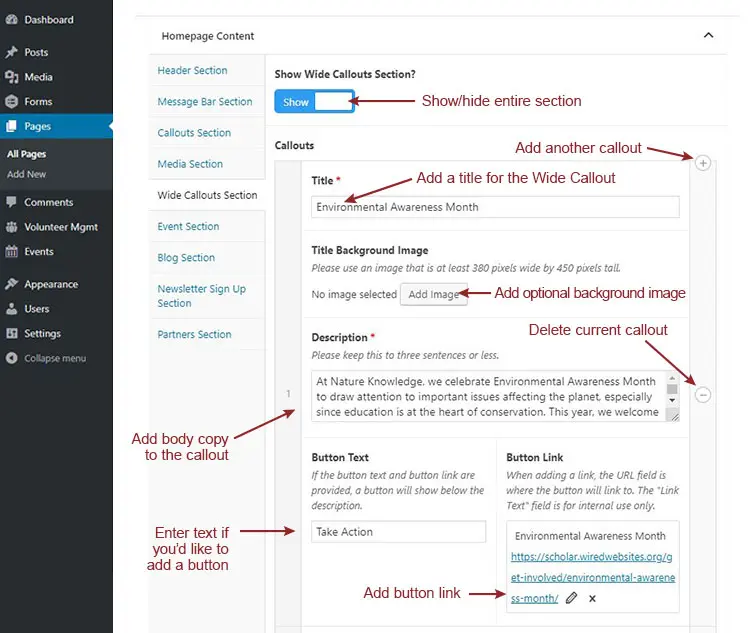
You can find the Wide Callouts section within the fifth tab down in the back end of your homepage. This section gives you the option to showcase any number of wide callouts on the homepage (though we recommend not exceeding six callouts to avoid making your homepage too long). We suggest using this section to explain in more detail what your organization does or to highlight important calls to actions or topics you really want to draw visitors toward.
- Toggle the Show/Hide switch to determine whether you’d like to show the Wide Callouts Section.
- You’ll launch right into customizing individual wide callouts.
- Give your first callout a title in the “Title” field.
- The title will show up on top of a dark background. You can add an image to spruce up this background by uploading an image cropped to 380 pixels wide by 450 pixels tall in the “Title Background Image” prompt.
- Enter a description for each callout in the “Description” field.
- Buttons are optional per callout. Add button text and select a link for each wide callout. This ideally would be a link within your site, but can also be an external link to another site.
- Add or remove tiles by clicking the + or – button that shows up when you hover over the gray bar on the right side of your callout settings in the back end.
Edit the Event Section
FEATURE AVAILABILITY
The Event System is available for Grow and Amplify plan websites. Change your plan in the Account & Billing section of your website Dashboard.
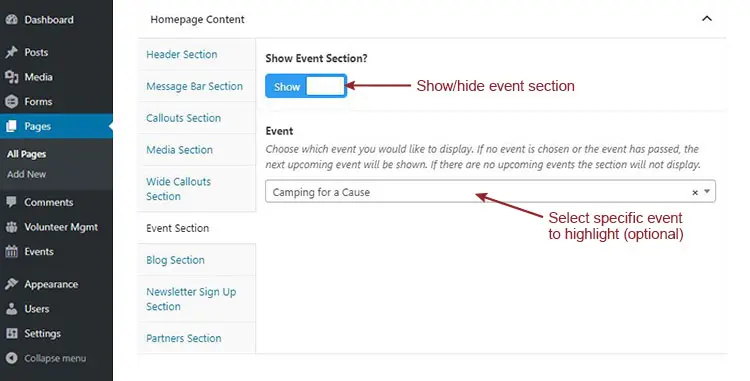
The Event Section is the sixth tab down on your homepage in the back end. This section pulls in the single most upcoming event automatically from the Event System in your website. You can select whether or not to show this section on your homepage by clicking the Show/Hide toggle at the top, and you can also select a specific event within the event system you’d like to highlight from the dropdown menu if you have an important event like a gala or annual fundraiser coming up in the near future that you’d like to show up over all other upcoming events.

If you don’t have any content in the Events system on your website, or if you’re on the Core plan, nothing will show on the homepage for this section. Your homepage will smoothly transition to the next section you’ve opted to show.
If you’ve selected a specific event to show and that event ends, the system will automatically pull in the next upcoming event so you don’t have to remember to switch events on the homepage.
Update the Blog Section
The seventh tab of homepage options is for presenting your most recent blog posts. Similarly to the Event Section, your most recent blog posts are pulled onto the homepage automatically from another section of your site.
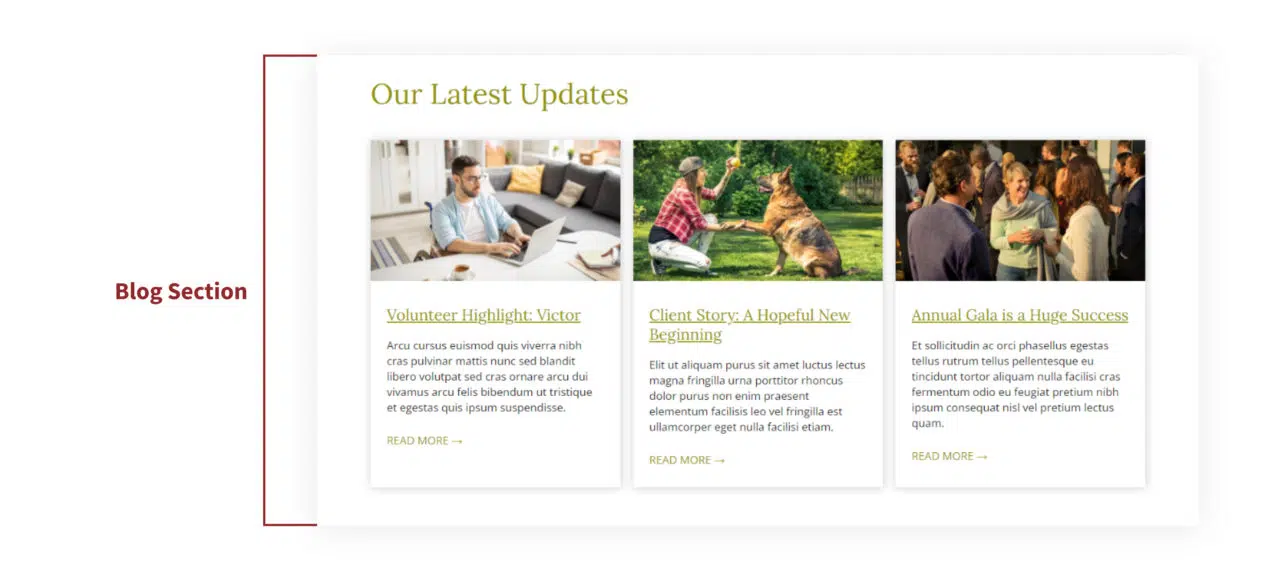
Any time you publish a new blog post, the newest post will automatically appear on the left side and move to the right as others are published. The three most recent posts will show here on the homepage. If your blog is empty and you do not post any blog posts, this section will disappear from your homepage.
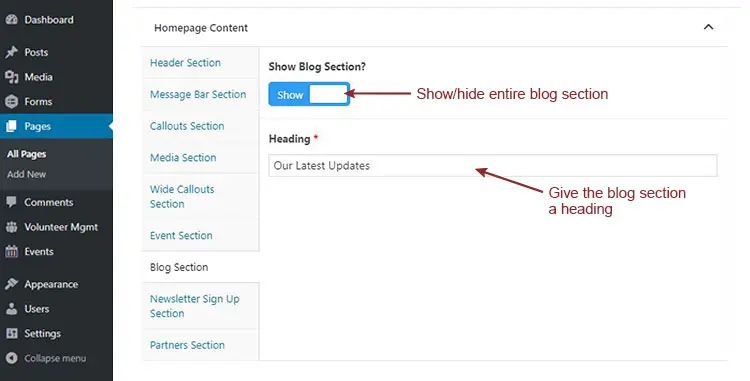
- Click the toggle button to dictate whether or not blog posts are pulled onto the homepage.
- If you have not published any blog posts or do not have a blog, this section will automatically be turned off and will not appear on the front end of your site.
- Update the heading using the “ Heading” field. For example, you might change the Blog Heading to “Recent News” or “Community Stories.”
Edit the Newsletter Sign Up Section
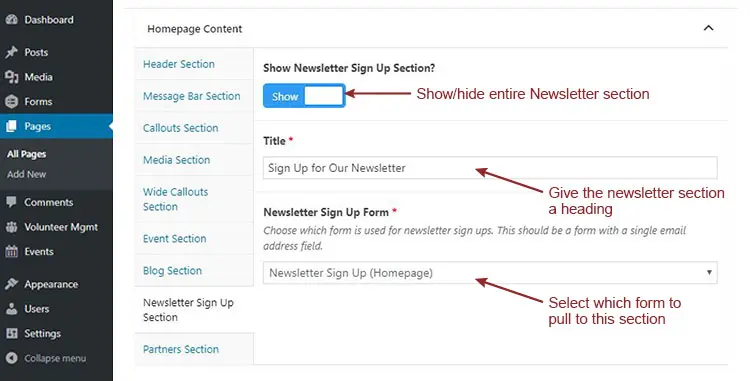
A prominent newsletter sign-up form is a great way to entice site visitors to stay connected with your organization. If you have an e-newsletter to highlight here, edit the settings for this section in the Newsletter Sign-Up Section in the eighth tab in the back end of your homepage.

- Use the toggle to show or hide the section as a whole.
- Type a section Title in its respective form field.
- Leave the Newsletter Sign Up Form selected in the drop down.
Edit the Partners Section
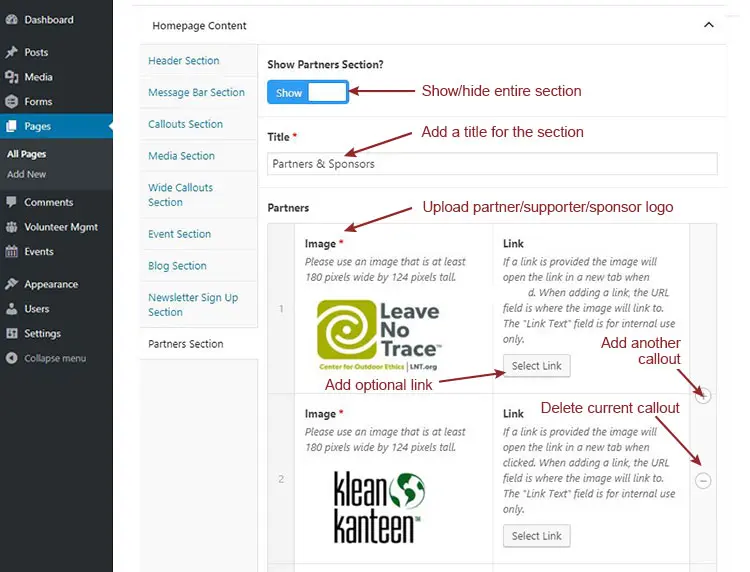
The ninth and final tab in the back end of your homepage is the optional Partners Section. This section allows you to upload the logos of partners, supporters, sponsors or sister organizations directly on your homepage. You can highlight as many or as few as you’d like.

- Use the toggle at the top of this section to display or hide partner logos.
- Add a title for the whole section in the “Title” field.
- Add or remove partner logos by hovering over and clicking on the + and – icons on the right side of the settings in the light gray bar.
- For each logo, you’ll need to select or upload an image under “Image”.
- We suggest uploading a logo that’s 180 pixels wide by 124 pixels tall, though the site will automatically size the logo down if it’s larger.
- If you’d like for the logo to link out to a partner website, you can add a URL into the “Link” prompt. It will automatically open in a new tab if the URL is an external link.
Still Have Questions?
The quickest way to get support is to reach out to us within your website’s admin dashboard. Log into your website and then fill out the Request Help form. You’ll hear back from us within one business day.