Use the steps below to connect your form with Constant Contact so you don’t have to manually add contact information each time a visitor submits your form. Instead, each time a visitor completes the form their submission information will be added to Constant Contact automatically.
FEATURE AVAILABILITY
The Form Builder is available for Grow and Amplify plan websites. Change your plan in the Account & Billing section of your website Dashboard.
Helpful Terminology
- The email provider refers to the service you use to send mass emails to your supporters. The most common providers are Mailchimp and Constant Contact, but there are many more.
- A feed on a form refers to that form’s connection with a third-party provider. For example, you would set up a feed to add a new donor to your provider’s email list automatically. This feed is typically processed each time a visitor submits your form.
- Conditional logic is used to determine the criteria in which a form’s feed is processed. For example, you may have an event registration form where visitors can opt to subscribe to your newsletter while registering for the event. The feed that adds subscribers to your email list would need to have conditional logic so that it only processes the feed when the visitor chooses to sign up.
If your organization uses an email provider that isn’t Constant Contact, learn how to connect to other services.
Set Up a Constant Contact Feed
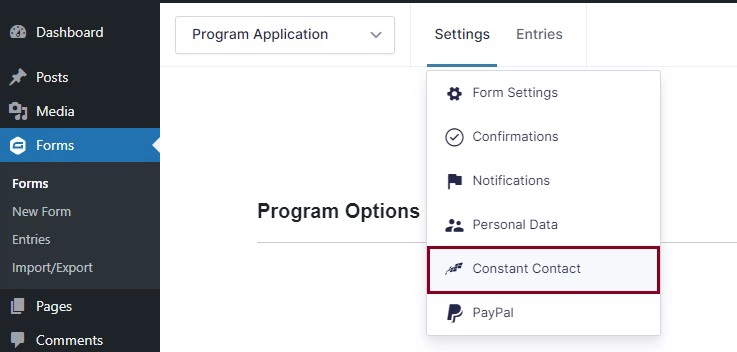
- While editing your form, hover over the Settings menu and click Constant Contact in the dropdown.
- Click the Add New button to create a new feed.
- Enter a Name for the feed. You can set this name to something generic such as “Constant Contact Feed”, or if you end up having multiple feeds that only run under specific circumstances, we’d recommend naming it something more descriptive. For example, on a form asking for contact information it’s possible the visitor provides both their personal and work email, then selects which is their preferred contact method. For this form you’d need two feeds, one to pass the work email address to Constant Contact and another to pass the personal email address. In that case, you may want to name the feeds “Personal Email Preferred” and “Work Email Preferred” to make sure they’re clear.
- Choose the Constant Contact List where you want the form to pass information into. In Constant Contact, lists are used to organize and group your contacts.
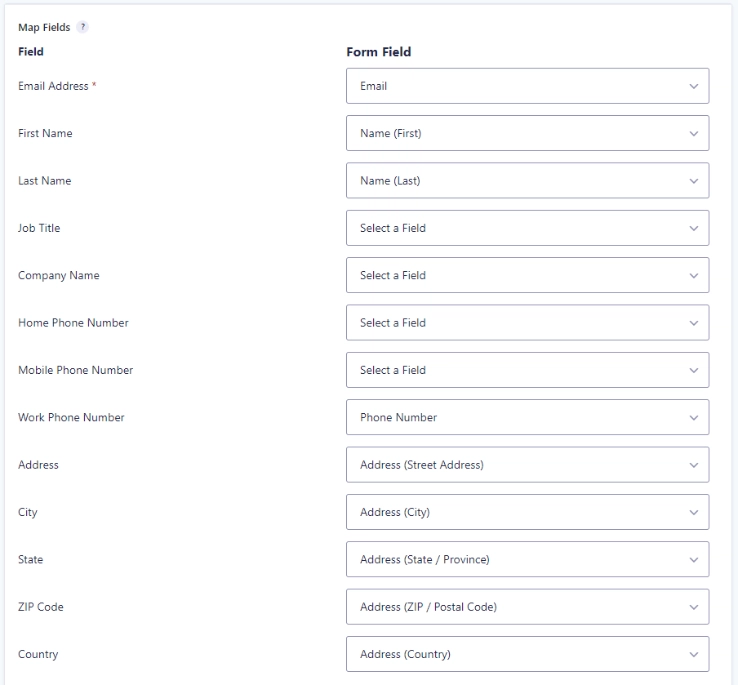
- For Map Fields, select the fields on your form under the Form Field section to map them with the corresponding Constant Contact Details Field on the left. Try to map as many of your form fields as possible. If you’re missing one, such as the Work Phone Number, you can leave it set to “Select a Field”. Be careful to map the fields correctly. When you’re done, the information should look similar to this screenshot.
- If you’ve created any Custom Fields within Constant Contact, a section will appear in your form’s feed called Custom Fields that allows you to map information from the visitor’s submission into your Constant Contact custom field.
- For example, let’s say you run an animal shelter and have a custom field for the contact’s “Dog Name” in Constant Contact. In your feed, you can map the visitor’s submission for the “Your Dog’s Name” field to the custom field in Constant Contact. When you’re done, the Custom Fields settings may look like the screenshot below. Keep in mind that you can use the plus (+) icon on the far right to map multiple custom fields.

- If you’d like the feed to execute only under certain circumstances, check the box to enable Conditional Logic. The conditional logic shown below causes the feed to execute only when the visitor chooses “Yes” for the “I’d also like to make a donation” field.
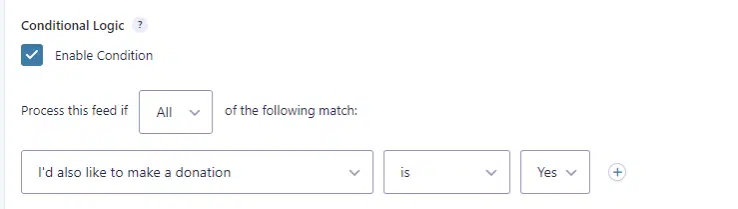
Please note that you can modify the feed to add multiple conditions using the plus (+) icon on the far right and can also choose to execute the feed if “All” or “Any” of the conditions are true.
- Review your settings and click the blue Save Settings button to save your feed.
- If you need to add another feed to the same form, start over and follow these steps again until all the necessary feeds are created. For example, you may need to create two feeds that each send information into different Constant Contact Lists.
- Most importantly, please test your form including each feed to ensure they send information into Constant Contact as expected.
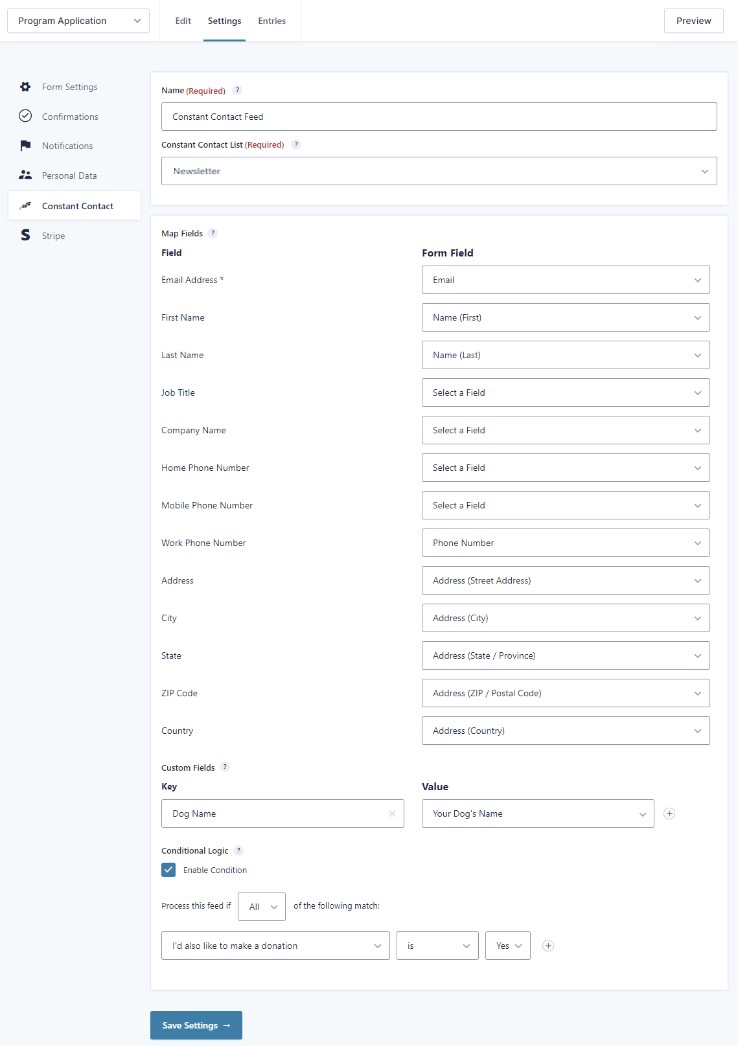
A Complete Constant Contact Feed Example
For reference, we’ve included a screenshot below of a completed Constant Contact feed. This feed adds the visitor to the “Newsletter” list when the form is submitted.
Still Have Questions?
The quickest way to get support is to reach out to us within your website’s admin dashboard. Log into your website and then fill out the Request Help form. You’ll hear back from us within one business day.