A nonprofit website audit is the best way to identify your site’s strengths and weaknesses. But they often take way too long, and as a result, most organizations simply give up — or decide against doing them at all.
If you’re looking for an easier, more efficient way to take stock of your site’s strengths and shortcomings, then you’re in the right place.
Find a step-by-step process you can use to audit your site in just a few hours. Uncover its strengths and shortcomings and learn how to prioritize your highest leverage changes.
Nonprofit Website Audit Template
A Comprehensive Template to Find Your Site’s Strengths & Weaknesses
If you want to know how your website is doing, our Nonprofit Website Benchmarks show how over 130 nonprofit websites performed, with data on traffic, engagement and top traffic sources.
Video Transcript
This webinar was originally part of our Nonprofit Website Office Hours series. The transcript has been lightly edited for clarity.
The whole point of a nonprofit website audit is to get a global view of your organization’s site and to identify those parts of the site that are great, as well as the areas that are falling short.
Our goal today is to give you a concrete plan you can put into practice this afternoon or later this week to conduct an audit, find your strengths and weaknesses, and prioritize the highest-leverage changes you can make on your organization’s website.
We know time is tight at most nonprofits. And the number one reason most folks don’t start or finish an audit is because there are just too many other things on your plate. So we’ve streamlined this process as much as we possibly can to make it as manageable as possible.
We’re going to start with an overview of what makes a great website audit, and then we’ll walk through the process we’ve shared with hundreds of nonprofits to actually conduct a nonprofit website audit.

Nonprofit Website Audit Overview
Let’s start with a quick overview of a nonprofit website audit to make sure we’re on the same page when we talk about this stuff.
First, what’s the point of auditing our nonprofit’s website?
Simply put, the goal is to identify your website’s strengths and weaknesses. Once you’ve done that, you’ll know what areas of your site still need a little love and where you should focus your efforts on making improvements to get the most out of your web presence.
Qualities of a Website Audit
What are the qualities of a great website audit? What does a great audit actually look like in practice? We’re going to use the acronym ACE for the three qualities a great website audit needs to have.
First off, a great audit should be actionable. The whole point is that you leave with an action plan so you can prioritize what next steps are going to be the best use of your time.
Next up, a great website audit should be comprehensive — at least comprehensive enough.
You don’t necessarily need to audit every single page of your nonprofit’s website. But you definitely need to include the most important pages since those are going to be the ones that will have the greatest impact on your visitors’ journey once they’re on your website.
And finally, a great website audit needs to be efficient. It just shouldn’t take a ton of time to complete. Because if it’s not efficient, it’s just a whole lot more likely that it’s gonna get bumped to the back burner.
So again, actionable, comprehensive and efficient. That’s really what we’re shooting for with our nonprofit website audit.
When to Audit Your Website
When is the best time to audit our nonprofit’s website? I typically recommend doing this shortly after the new year to set yourself up for success in the year ahead.
But if the beginning of the year is too busy, that’s fine. You can certainly do it in the months ahead. Some organizations will do an audit a few months before a major initiative or event or campaign.
That should give you enough time to conduct the audit and implement any high-priority next steps. That way, you can make sure your website is in great shape ahead of a time when you’re going to really lean on it to engage your community.
How Often to Audit Your Site
And finally, how often should we audit our nonprofit’s website? I recommend shooting for doing this annually to start.
If you get to the point where you’re conducting these audits and you’re not finding a ton of things you need to change, you could always dial back the frequency to something like 18 months.
But the nice thing about starting with doing this annually is that you’ll hopefully avoid needing to make drastic changes each time you conduct an audit because things won’t have enough time to get that outdated since you’re keeping an eye on them more regularly.

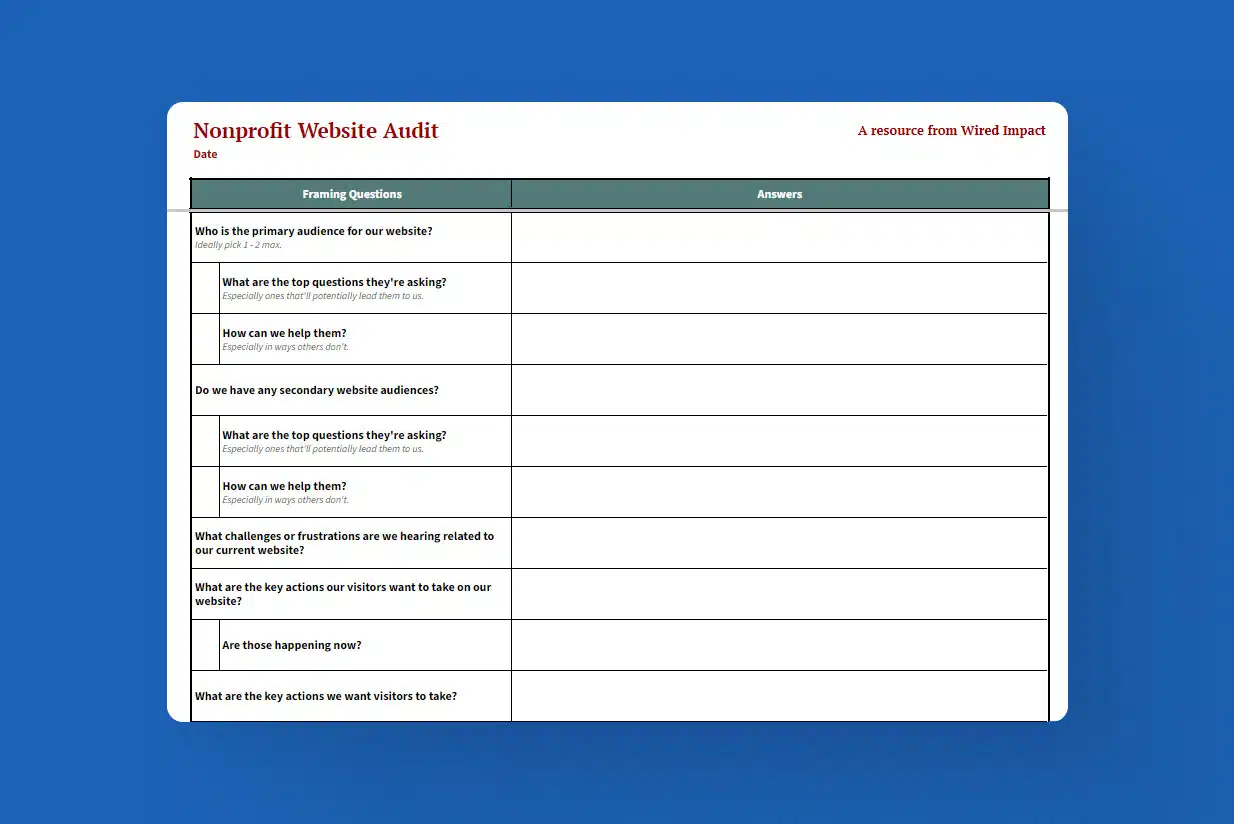
Website Audit Framing Questions
Before we jump into actually conducting the audit itself, I recommend starting with a few framing questions to get in the right headspace and make the whole process as impactful as possible.
You don’t necessarily need to write down answers to all of these questions. But I’ve found asking and answering these questions brings a lot of clarity to this whole website audit process, and it helps me view my website as my visitors do instead of how I do personally.
It’s hard to remember that we have way more context than our visitors will when they’re on our websites. So getting into their shoes for a minute can be really helpful.
Who is the primary audience?
First question: Who is the primary audience of our website? I always push folks to limit this to one or two audiences maximum. I know that’s really hard. But getting clear on who your website is primarily for will bring a lot of clarity to not only the website audit process, but your website overall.
And then a couple of related questions I’d encourage you to answer once you’ve identified your primary audience:
- What are the top questions our primary audience is asking that would potentially lead them to us? What are they looking to find information about or answers to when they land on our website?
- And how can we help them? Especially in ways that other organizations can’t?
This is going to help you figure out the role that you play for your primary audience and ultimately create the most helpful content we can for the needs and desires of your visitors.
Do we have any secondary audiences?
Next up: Do we have any secondary audiences? This is where all of those folks you had to leave out of your primary audiences come into play, so you still get to include them! It’s just important to remember that they’re secondary audiences. You want to prioritize your primary audiences as much as you possibly can.
And then again, once you’ve identified your secondary audiences, I find it’s helpful to ask those similar follow up questions. What are the top questions that they’re asking? And how can we help them in ways that other organizations can’t?
Between those two questions, now we’re clear on our primary audience, and we’re clear on our secondary audience, and we can jump into this next question.
What challenges or frustrations are we hearing related to our website?
What challenges or frustrations are we hearing related to our website? It could be you’re hearing things outright from folks in your community, but it could also be that people are showing you some challenges through their behavior.
For instance, one of the challenges we frequently hear is that information is hard to find on the current website. It might be folks are outright telling you, “I can’t find what I’m looking for,” which makes it pretty easy to figure out that’s an issue.
But it might be showing up in more subtle ways. Maybe you’re getting asked questions when you know the answers to those questions are on your website, or people would rather call and talk to your staff than try and find information on their own through the site.
Or maybe you’re even seeing it in website analytics in pages with high exit rates or bounce rates. These can all be more subtle indications that visitors are having trouble finding what they’re looking for on your site, even if they’re not outright telling you.
By focusing on these challenges related to your current site, you can keep them in mind as you work through your website audit process. And again, hopefully, it helps you address these issues as you go.
What are the key actions our visitors want to take on our website?
The next question we want to ask: What are the key actions our visitors want to take on our website?
Notice this question is framed from the perspective of your website visitors, not your organization. What are your visitors looking to do on your website?
Thinking through that can help you meet your visitors where they’re at and help them get the most out of their time on your site. It’ll also help you build the most helpful, logical conversion paths for your visitors.
Conversion paths are the journeys visitors take from where they land on your website to where they ultimately convert.
This will help you guide them from the moment they arrive on the site to the point where they ultimately take a meaningful action, which is what we often call conversions.
And once you’ve outlined these key actions, ask yourself, “Are each of these key actions happening currently on our website?”
That’ll serve as a nice jumping-off point when it comes to making sure your website is providing a great experience for your visitors and making those key actions as likely to happen as possible.
What are the key actions we want visitors to take?
Next up, we’re going to flip that a bit. What are the key actions we want visitors to take?
Now we’re focusing on the actions that are key to our organization. Some common examples are things like making a donation, expressing interest in volunteering, reaching out for services or support, becoming a member, applying for a job or accessing research or resources.
The more tightly you can align these types of website actions with your broader goals as an organization, the better.
Another way I sometimes approach this question is to think, “What needs to be happening on the website six months in the future for me to feel like the website is moving our mission forward?”
Then we can use that mental reframe to back into our most important website goals and project out into the future the way that those website actions will impact our broader goals as an organization.
Once you have that list, ask those questions we just talked about: “Are these actions happening now on the website?” We want to take stock of how the website is doing as far as supporting these key actions.
The combination of those two questions — what do our visitors need to be able to do, and what actions do we want visitors to take? — can be a helpful baseline on the results we’re looking for from the site and hopefully put us in the mindset of what needs to be improved as we jump into the audit.

Conducting Your Website Audit
Speaking of which, let’s jump into the website audit itself! It’s time to actually start conducting our nonprofit website audit.
We’re going to start with the ideal audit process. This is the best way to streamline your website audit and help keep the time it takes to a minimum while still making it as helpful as possible — because that’s ultimately the goal here. We want to minimize the time this audit takes while maximizing the value we get from it.
How do you actually do that?
Block your calendar
First, it’s helpful if you can block your calendar. It helps to do this in as few sittings as possible.
Because at the end of the day, we’re looking for trends across our website during this audit. And doing a page here and there over many weeks makes it a lot tougher to see that bigger picture.
Take it from me, as someone who has done audits both ways before. Fewer sittings is going to make your life a whole lot easier and be a lot more helpful.
Gather your tools
Next, you’ll want to gather your tools. Most likely you’ll end up needing three things here:
- First is access to your website, obviously.
- Second is some sort of website audit document. We’re going to share a template you can use, or you can create your own. But you’re going to want some way of actually recording your takeaways from your audit.
- And third, you’ll want access to some sort of website analytics if you have them. If you don’t, it’s not the end of the world, but it can definitely help.
Nothing too fancy here. Just your website, some sort of audit document or way to collect thoughts and website analytics.
Identify your priority pages
Then you’re going to identify your priority pages. Typically, priority pages will fall into one of three categories.
- First, what are the most important pages for our audience to accomplish those key actions they’re looking to take?
- Second, what are the most important pages to us when it comes to those actions that we’re looking for visitors to take?
- And third, what are the most popular pages on our website?
The reason we look at page popularity is because those pages are going to have outsized impact on the journeys of your website visitors because they’re being seen by more people.
If your site is really large, you don’t need to audit the whole thing. Start with the priority pages. And if you have a 100-page website, maybe shoot to start with 20 or 30 pages. You can always audit more if you get through them all. But that should give you a solid foundation.
Fill in website data
Once we have our priority pages, that’s when I fill in the website data for all of those pages. And I do this first before I dive into analyzing the content of my pages.
I find it more efficient to knock out the data piece for all pages at once. Batching this type of work when I’m in a different tool, like Google Analytics, streamlines things and helps me prioritize pages.
Audit page by page
Then after I have my data, I work through the website audit page by page.
Focusing on one page at a time helps me be as thoughtful as possible and keeps the audit from feeling too overwhelming. That’s when audits start to feel daunting is when we feel like we have to audit our entire website at one moment in time. So work through it page by page.
And as I work through each page, I keep some of those framing questions in mind.
- Who is the page intended for? That ties to those audiences that we’ve identified.
- What are they trying to accomplish on this page? That ties into those actions that visitors are looking to take.
- And what’s the next step in their journey? Which ties into those actions that we’re looking for visitors to take once they’re on the site.
Thinking about each page from the perspective of your visitors, instead of just yourself, will really help make the audit as helpful as possible.
Make notes, not edits
Then last, but perhaps most important: we are making notes as we audit our website. We are not making edits in real time.
We are not making changes as we go. We just want to document the things that need further attention.
In this initial audit, we’re much more focused on identifying the problems with our current website. We’ll get into solutions once we have the problems clearly outlined. Because then we can prioritize.
The problem a lot of people run into is they start making edits in real time. And then they run out of time because they’re doing too much upfront. And a lot of that time is spent on lower priority edits because those are often the easy ones.
So if you’re making notes instead of edits, you can wait until you’ve identified all of the different problem areas of the website and then prioritize the areas that you’re going to get the most value from.

Auditing Your Website
Alright, so let’s dive into the actual audit document that we recommend using. You can create a copy of this yourself.
Here’s a snapshot of what our nonprofit website audit template looks like.
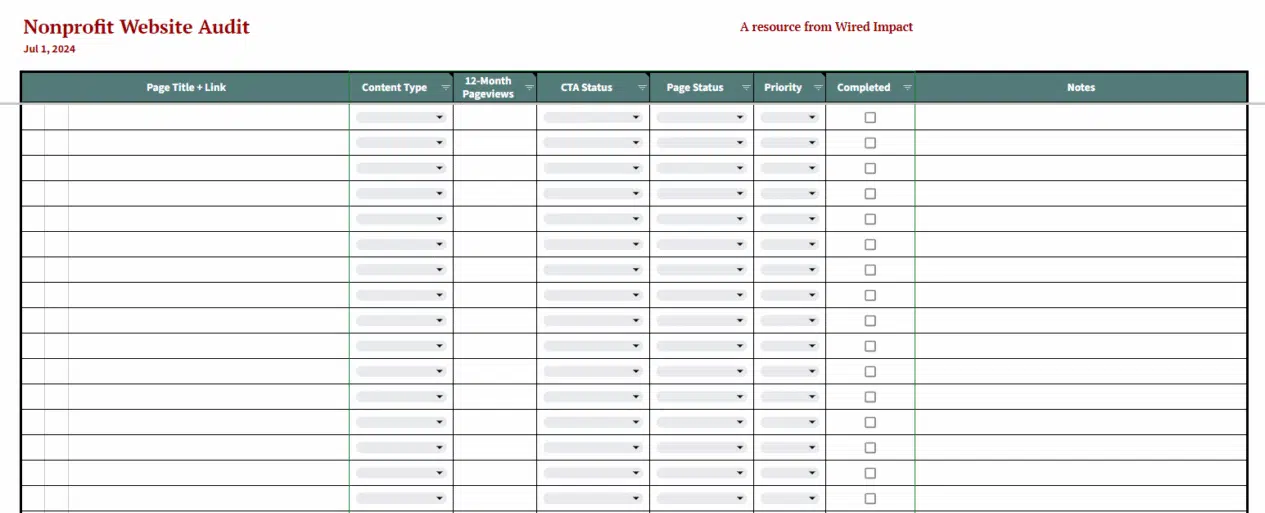
We’re going to dive into each column to dig deeper on how to use it, and we’ll be referencing what column we’re talking about in the audit document as we go.
Of course, you can adapt this audit template if you need it to be something else for your unique situation. We’ve made this to work broadly for hundreds of nonprofits, but you can absolutely tailor it to your situation.
Document pages to audit
The way I work through an audit is to take it page by page and go column by column. Here, we’re going to start with the page title and the link column.
This is going to span Columns B–D, if you’re following along in the template.
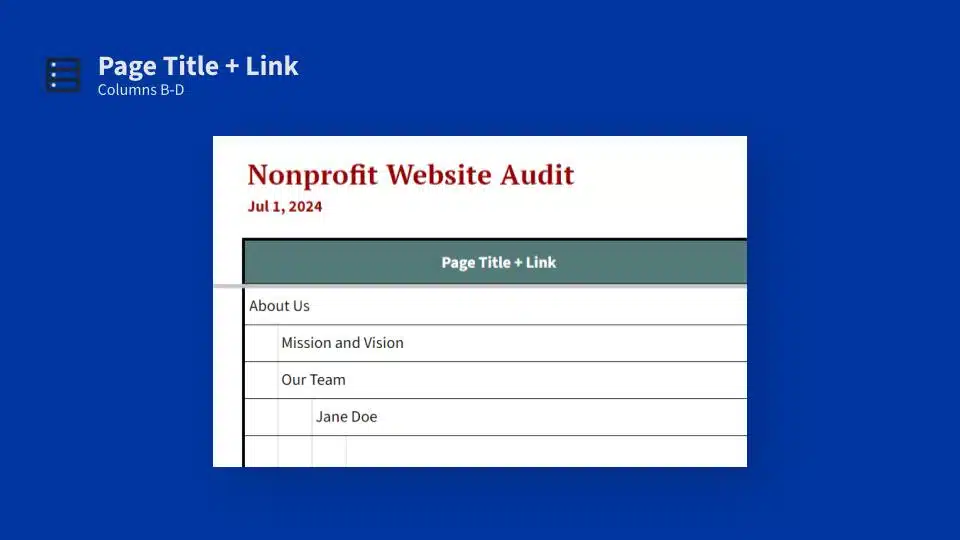
We’re going to be covering the priority pages we discussed before. And I find it helpful to link each page title so that I can quickly access the corresponding page on my website later on.
You’ll also see that you can represent your website’s structure, like the hierarchy of your website, using the indentation approach. So in this example, About Us is the parent page, and Mission and Vision and Our Team are subpages, or child pages, of About Us. Then Jane Doe is a child page of Our Team and a grandchild page of About Us.
I do that because I find it helpful to have some easy way to understand how all the pages fit together. And as you get 20, 30 pages in here, it can start to be a little less clear how they fit.
You don’t have to do this, but I’ve personally found that it can help make it more clear how these pages all fit together.
Capture the content type
The next thing I work through is capturing the content type for each page. This is going to be Column E in the spreadsheet.
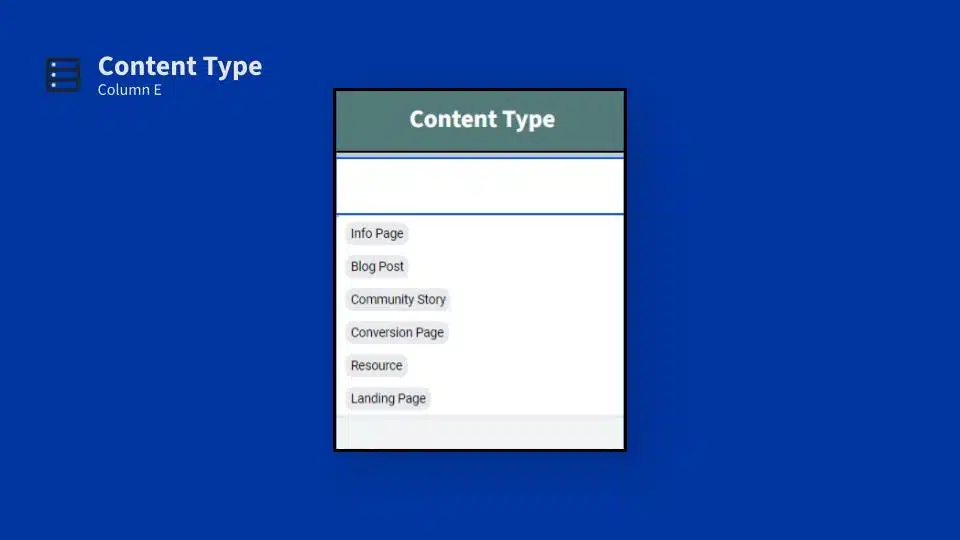
We’ve included a dropdown that will cover the most popular content types we’ve found in our experience. I’m going to walk through those quickly, but I want to mention that it’s possible a page will fit into multiple content types. That is absolutely fine. Just pick the one that feels most appropriate.
The main point with this dropdown is that you’re able to filter by content type if you would like to as you work through making updates later on.
- Info Page: These are your standard web pages that provide information about your organization or your work.
- Blog Post: This one is pretty straightforward.
- Community Story: This is exactly what it sounds like. If you’re sharing stories from your community, which we’re big fans of, you’ll want to categorize those.
- Conversion Page: These are the pages where you’re typically capturing visitor information, like donations or registration pages. A lot of times, these will have a form on them of some sort.
- Resource: This is any guide, toolkit, downloadable asset or research report that you may have made available to visitors. They could be a standalone page, they might be subpages of a resource library depending on the layout of your site.
- Landing Page: These are pretty common when you’re tying them to some sort of campaign or running ads. Oftentimes these landing pages are going to be free-floating pages that live outside of your navigation, and visitors are going to arrive on them directly by clicking a link in an ad or scanning a QR code or typing a shortened URL into their browser.
You may have other page types. This isn’t necessarily an exhaustive list. You can definitely customize the dropdowns in the audit template to suit your needs. But hopefully this is a helpful place to start.
And if at any point you do want to customize the content types, or any dropdown, in the audit template, you’ll see a tab at the very bottom that says “Dropdown Variables.” You can click on that and change any of the dropdowns to include whatever is going to be most helpful to you.
Dive into your website analytics
Now we have our priority pages outlined, and we’ve categorized them all by content type. Next, we’re going to dive into our website analytics. And here, I recommend pulling the number of page views over the last 12 months.
If you’re using Google Analytics 4 to pull this data, this is where you’re going to want to visit. We pulled this up because Google Analytics 4 is not the easiest to use right out of the box.
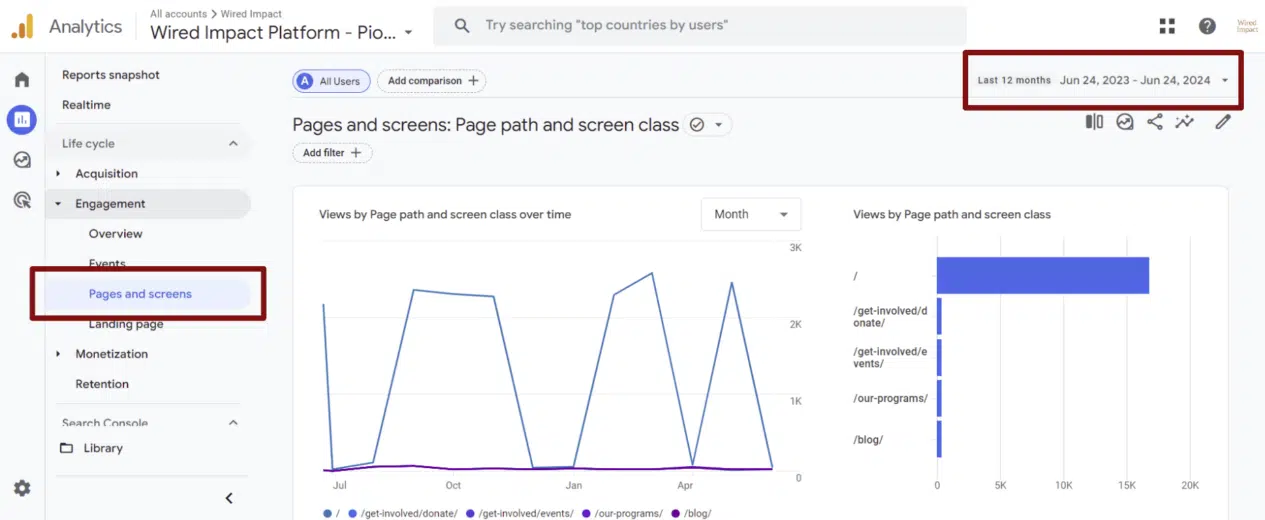
You’ll want to log into your Google Analytics 4 account, and on the left, go to Life cycle >> Engagement >> Pages and screens. This is going to load the report we’re going to use to see our most popular pages on our website.
In the upper right, where that red box is, you’ll want to change the date range to use “Last 12 months.” That’s going to show you the number of page views over the last 12 months for the most popular pages on your website.
Then scroll to the very bottom of Column F in the audit template and document the start date and the end date of that date range directly in the audit document.

This is just helpful for future reference, especially if you end up splitting your website audit up into multiple settings. (But again, please try not to do that if you can avoid it.)
Ideally, I’ll fill in this whole column with page view data from Google Analytics for every page that I plan to audit before I start auditing each page. Pulling all the data in one sitting, at one time, makes it a lot easier than pulling that as I go.
The other nice thing about doing it upfront is that it helps me more thoughtfully prioritize which pages I’m going to start with because I can more directly compare the traffic that each page is seeing.
And if two pages feel important, but one is getting 1,000 page views a month and one is getting 10, it’s pretty clear which one I should start with. I’m going to start with the more popular of those two pages.
Review your calls to action
Now we’re actually getting into auditing each individual page. And the first thing that I start with is analyzing my call to action, or CTA.
The call to action is the most logical next step that your visitors will want to take when visiting this page. And the best calls to action are tightly connected to the page they’re embedded on. This helps you meet visitors where they’re at and thoughtfully guide them to the most helpful next step in their journey.
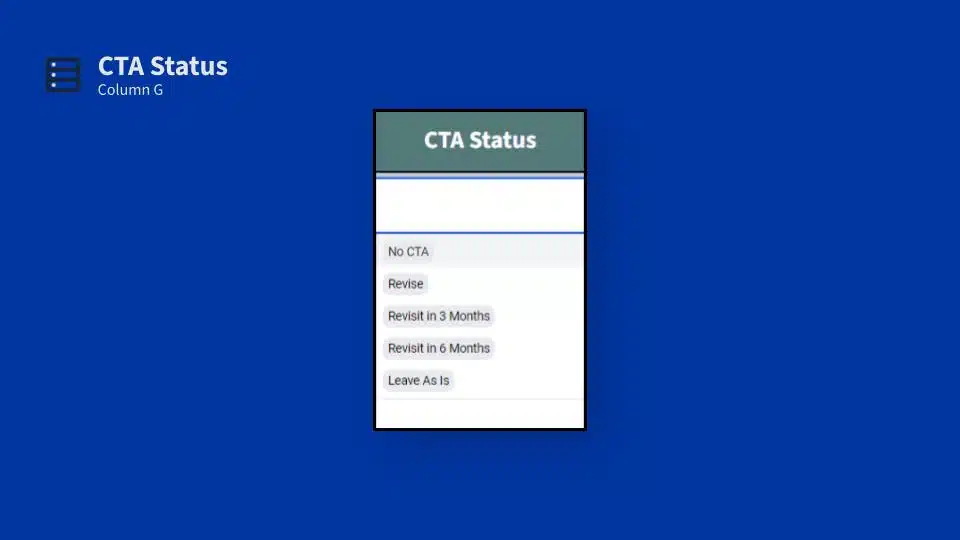
This is Column G of the audit template. It has a few options by default:
- No CTA: If your page doesn’t have a call to action currently, it could be helpful to at least consider adding one.
- Revise: This is for if you need to swap out the call to action on the page.
- Revisit in 3 Months and Revisit in 6 Months: These are helpful if your call to action might change throughout the year. Maybe you’re promoting an event that’ll pass in six months; flagging this during your audit can help you remember to come back to it and swap that call to action out when the time comes.
- Leave As Is: This is if your call to action is good to go and you don’t need to do anything to spruce it up.
Again, I wouldn’t recommend rewriting your calls to action as you work through the audit process. I would just document it here in Column G and add any notes or thoughts that you have to Column K.
There’s a notes column in our audit template. As you work through it, you can definitely capture initial ideas. But circling back to your calls to action after you’ve completed your whole audit not only helps you prioritize them, but it will also help you standardize them a bit more between all of your pages.
Audit your page content
Next up is Column H. This is your page status. This is where we’re actually auditing the content of the page as a whole. This is going to be the heavy lift for a lot of this audit.
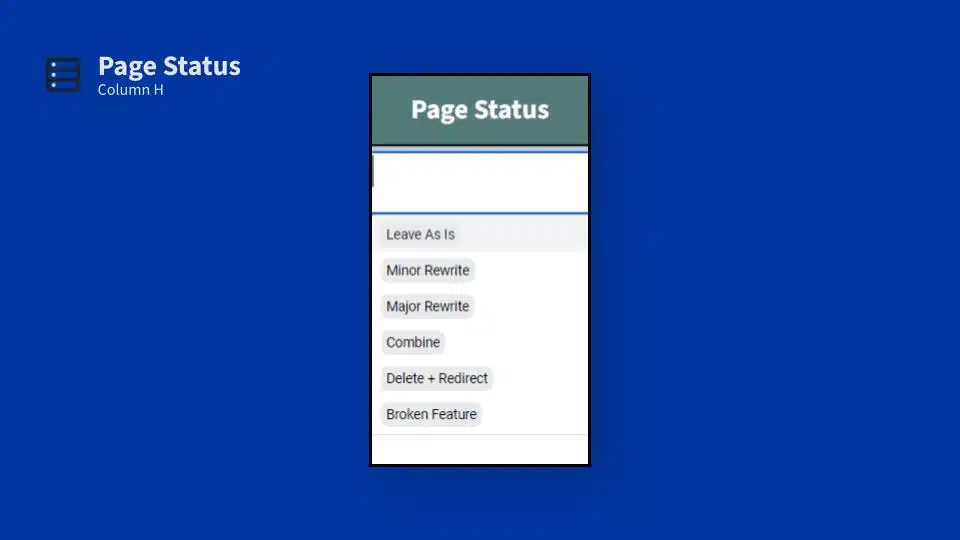
And we’ve included a few default options in the dropdown. Feel free to adjust them if there’s any that you feel like are missing.
The first, Leave As Is. If your page is in good shape, mark it Leave As Is and stop thinking about it.
Next is a Minor Rewrite. This is if your page needs some tweaks here and there, like freshening up some out-of-date content or swapping out a stale image.
Next, a Major Rewrite. This is for those pages that could use a pretty substantial overhaul. That could be something like revisiting your messaging or rewriting how you talk about a program or revisiting the layout of a page. These are going to be bigger lifts as far as how much work they take to complete.
The next option here, Combine. You may find that over time, especially if you launched a site a while ago and added pages throughout the years, you may have launched some pages that are somewhat redundant or have some overlapping content.
This is even more common if it’s been a while since you’ve audited your website. Sometimes it makes sense to combine and streamline the number of pages on your website to simplify things for your visitors (and for you as an admin).
And along those lines, you also might run into situations where you use this Delete + Redirect option. It’s not uncommon to end up with some outdated pages that could be retired. With websites, we’re often quick to remember to add new pages, but it’s easy to overlook retiring pages as our programs change or the way we serve our community changes.
And whenever you delete a page, I always recommend implementing a 301 redirect. You’ll also want to do this if you combine a page and the URL changes.
A 301 redirect is a redirect that signals to search engines that this page is permanently redirected to a new page. And that’s going to help accomplish two things.
First, it helps your visitors not land on that “Page not found” error, which I’m sure you’ve seen over the years, clicking a bad link somewhere. And it helps you maintain as much search engine value as possible. Because your pages actually build up value in the eyes of search, and those redirects are a way to forward that value to a new location on your website.
The way that you actually implement those redirects will vary widely depending on the technology powering your site, but it’s a helpful thing to look into and implement if the URL is changing or if you’re deleting a page.
And the final option here, Broken Feature. This is what you’re going to use if you spot anything that’s broken on any of your pages. That could be something not loading correctly or a form not working as expected. And depending on what’s broken, you may need to tap in some programming help to get things fixed.
But at this point, just note what those things are, note what’s broken, and that’ll help you prioritize the fixes that need to happen once you come back to implement those changes.
Prioritize your changes
Speaking of prioritization, the next step in the website audit process is to fill in a priority level. You’ll see we have High, Medium, Low here.
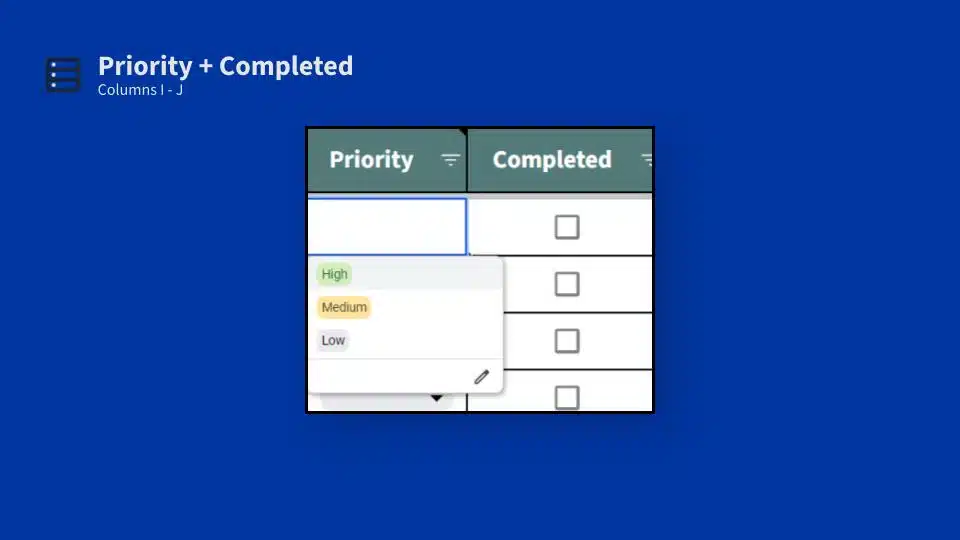
Here is how I think about them:
- High priority fixes are things that I need to update in the next two weeks.
- Medium priority fixes are things that I need to update in the next three months.
- Low priority fixes are things I will get to whenever I have time.
And if I’m leaving a page as is, I just ignore this column.
Realistically, you only have so many hours in the day. You only have so much capacity to make improvements to your website. For that reason, I try to be pretty ruthless about my high priority updates. Because if everything is high priority, nothing actually is.
We’re not going to be able to change every page we want to change in the next two weeks. What we need to focus on, ideally if we can, are those pages that are going to move the needle most for our visitors and for our organization.
I try to pick the high priority pages that require less intensive amounts of work. Those minor revisions, as opposed to those major revisions, or swapping out calls to action. Those are going to be my quickest wins.
Then I can move on to other, high priority pages that require more work and ultimately finish the lower priority items.
And you’ll see there’s also a “Completed” column here. When I finish making updates to a page, that’s when I mark the checkbox in this completed column, which is Column J in the spreadsheet. That way, we can easily see what we’ve finished and what still needs to be done.
You can also mark pages as complete if you’re just going to be leaving them as is. I think that’s a helpful way to more easily scan the document and see what still needs my attention and what I can stop paying attention to until my next website audit.
Document any notes for the future
And then finally, Column K. This is where you’re going to jot down any notes that come to mind as you’re auditing your nonprofit’s website.
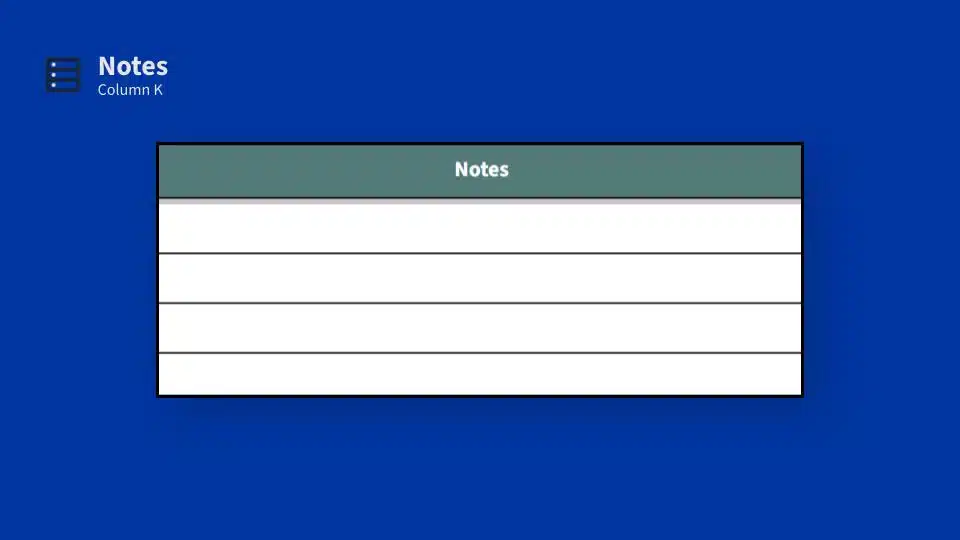
For me, this is typically a combination of clarifying info from the previous columns that I’ve filled out and capturing initial ideas about changes ‘d like to make in the future.
Don’t spend too much time thinking about edits. But sometimes, an idea for the page will come to mind as I’m conducting my audit, and I don’t want to lose that. I want to capture those initial thoughts so that when I circle back to implement changes, I have them handy.
There you have it. At the end of this process, you’ll have identified your website’s strengths and weaknesses, and you’ll have a punch list of pages to focus on revising.
Again, start with those high priority pages that don’t require a ton of work. Those are going to be your quick wins. If it’s a high priority, high traffic page that doesn’t need a lot of work to get to really solid shape? That’s where to start.
And then I also like to strike through things that I’ve put in the notes section as I work through them. I find that just makes it a little easier to see what’s done and what still needs to happen, but that’s totally a personal preference thing. You do not have to do that if it makes it harder for you to use the document in any way.
That is our nonprofit website audit process! I hope you find this process and the audit template helpful. And if any questions come up as you dive in, just let us know. We are happy to get them answered.
What You Should Do Now
01. Come to Nonprofit Website Office Hours
We cover a new topic every few weeks. Plus get a live answer to any website-related question you're wrestling with.
02. Book a Website Call
Find a time to discuss your nonprofit's website needs. Discover what's worked for other nonprofits like you and see how easy building your new site can be.
03. Start a Free Website Trial
Try our nonprofit website platform for yourself. Instantly get access to every feature to see if it's the right fit for your needs. No credit card required.
Comments