Every now and again you’re going to want to refresh the content on your homepage. And we get it… it can be hard to remember where to change every little detail. In this article, we’re outlining exactly how to update all of the content on your homepage using the Vision theme. If you’re not using the Vision theme, check out how to adjust the homepage content in other themes.
To revise anything on your website, you’ll first need to be logged in to access the back end of your site. Use the labeled photo for reference and the bulleted list of links below to find instructions for how to revise each specific section of your homepage in the back end of your site.
It’s worth noting that there are many sections you can choose whether or not to display, making the Vision homepage very customizable. However, you won’t be able to change the order in which the sections appear.
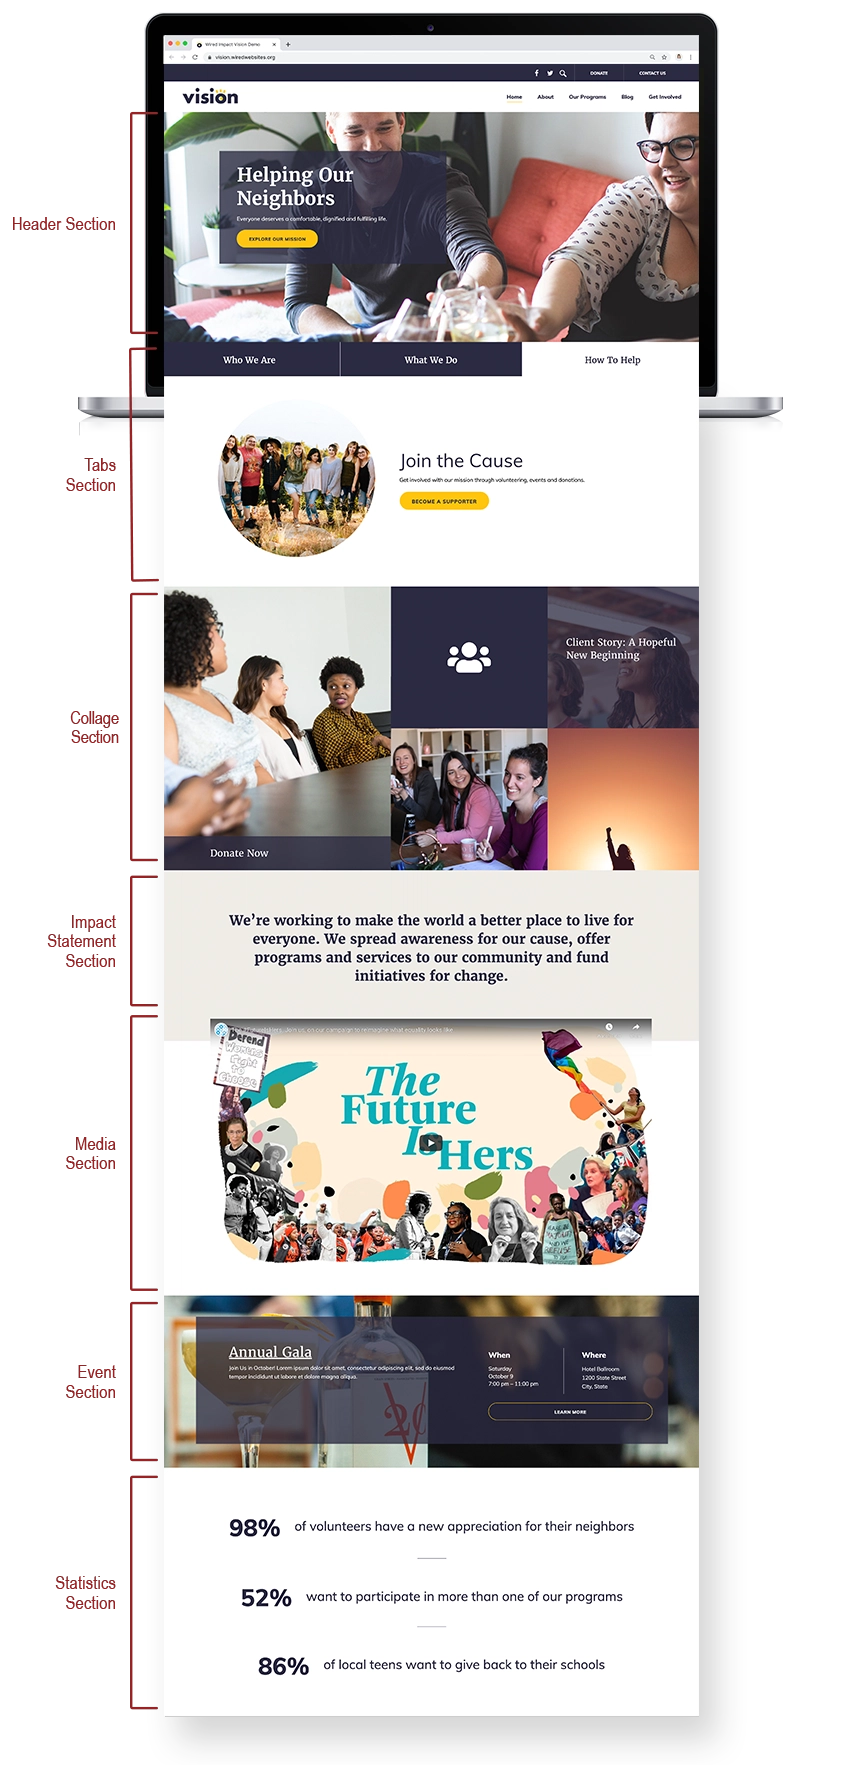
Edit the Header Section (Image, Text & Button
The Header Section includes the large image you see across the full width of your screen as soon as your homepage loads, as well as the colorful box of text with a button on top of it.

Change the Header Image
You can swap out your header image by first cropping a photo at 1920 pixels wide x 945 pixels tall. Upload it to the section labeled “Image” in the “Header Section” tab of the homepage.
- Hover over the current image in the back end and click on the “x” in the upper right hand corner to remove the existing image.
- Click the new ”Add Image” button that has shown up.
- Drag the new desired homepage hero image into the upload box.
- Don’t forget to add an Image Title and Alt Title.
- Click the “Update” button on the upper right corner of the screen before closing out.
Change the Header Text
You can customize the text and button that appears overtop of the header image at any time. Update this text by filling in the appropriate fields in the Header Section tab.
- The Title text is the large text that appears on the top line(s). This text is required, and can be any short phrase of your choosing.
- The Tagline text is the paragraph text that appears in between the title and button. This text is required, and it’s best to keep the length to two sentences or less.
- The Button Text and Button Link are required. They help you direct people to another page that relates to your Title and Tagline. We suggest that this call to action drive visitors to learn more about you and engage in a meaningful, broad way.
- Click the blue Update button when you’re ready to save your changes.
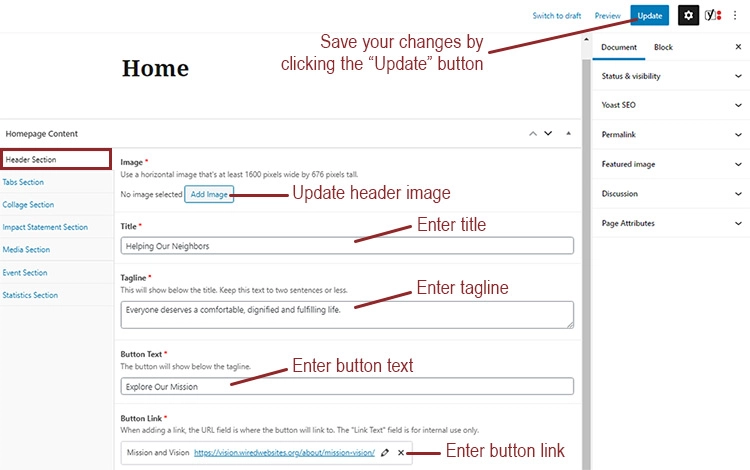
Edit the Tabs Section
The Tabs section is required and located directly beneath the Header image. This section can be used to highlight three different pieces of information, such as different programs or background information about your organization.

For each of the three tabs, you’re required to include:
- Image measuring 463 pixels by 463 pixels square
- Tab Title that appears at the top of the tab
- Heading that appears within the tab along with the image
- Content, a short blurb of paragraph-style text
- Button Text to describe the action you want people to take when they click
- Button Link, the page you want to send people to when they click
Don’t forget to click the blue Update button when you’re ready to save your changes.
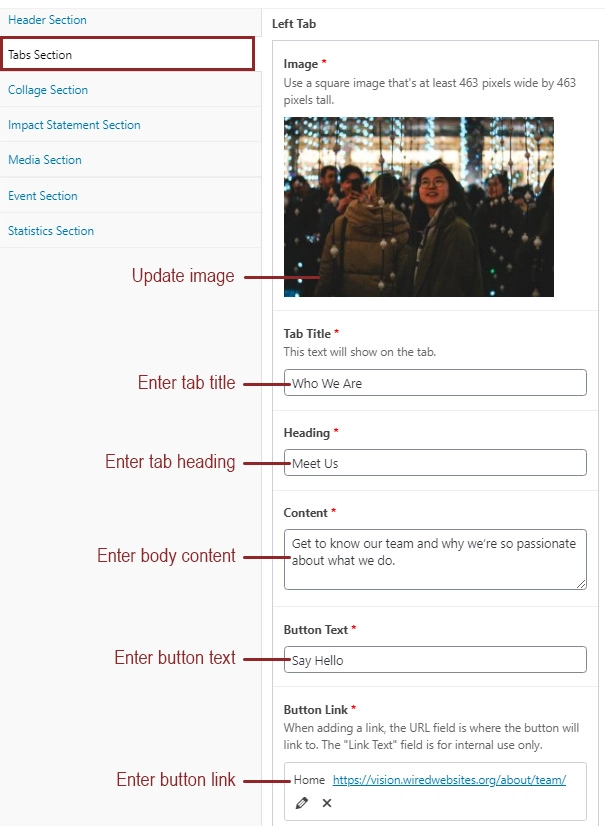
Change the Collage Section
The Collage section comes after the Tabs section on your homepage. Each part of the section is required, but you have flexibility in the types of information you share. There is no set recipe for the content that you feature here, but it’s an ideal location to promote your latest news and important calls to action.

Left Full Height Item
This is the largest part of the collage and contains the following required parts:
- Image measuring 809 pixels tall and 836 pixels wide
- Heading, the large text accompanying the image across the bottom
- Content, the paragraph-style text below the heading
- Link Text, the copy that will be clickable for people to learn more
- Link URL, the page where you want people to go when they click the link
Click the blue Update button when you’re ready to save your changes.
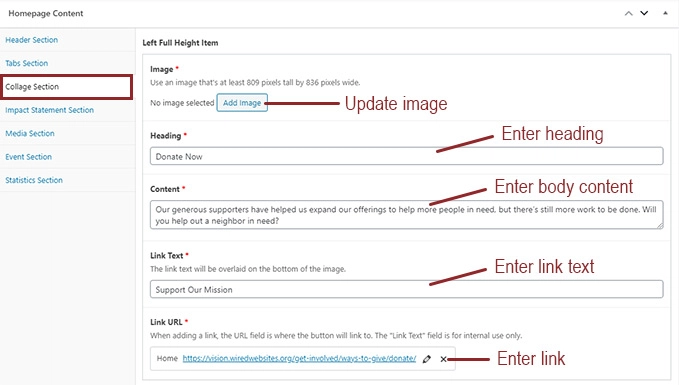
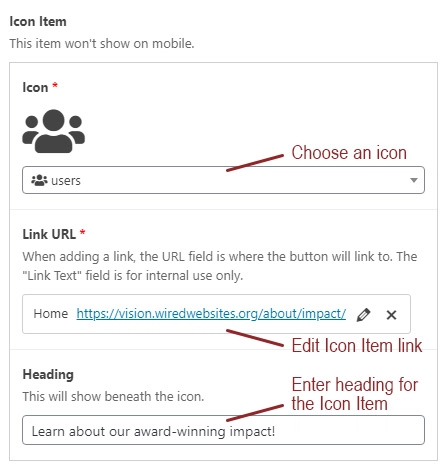
Icon Item
This part of the collage appears as a solid color box with an icon and linked text. It will not show up when a user is on a mobile device.
- Choose an Icon from the library by scrolling or searching for one that meets your needs.
- Set the required Link URL for the entire box that will send visitors to another page
- Use the optional Heading to have the linked text show below the icon.
- Click the blue Update button when you’re ready to save your changes.
Flexible Item #1
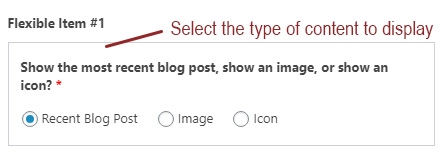
This section appears to the left of the Icon item on desktop devices. You have the option to display your most recent blog post, an image or an icon.
- If you choose Recent Blog Post, this section will automatically show the newest post on your blog, if you have one. All of the content will be automatically populated using the title, introduction (or excerpt) and URL of the post.
- For an Image, use one that measures 548 pixels wide by 418 pixels tall. You’re required to add an accompanying Heading and Link URL so that the image is clickable.
- For an Icon, you’ll have the same options as in the Icon Item.
Click the blue Update button when you’re ready to save your changes.
Flexible Item #2
This section appears below the Icon item on desktop devices. You have the same options as described in Flexible Item #1.
Image Item
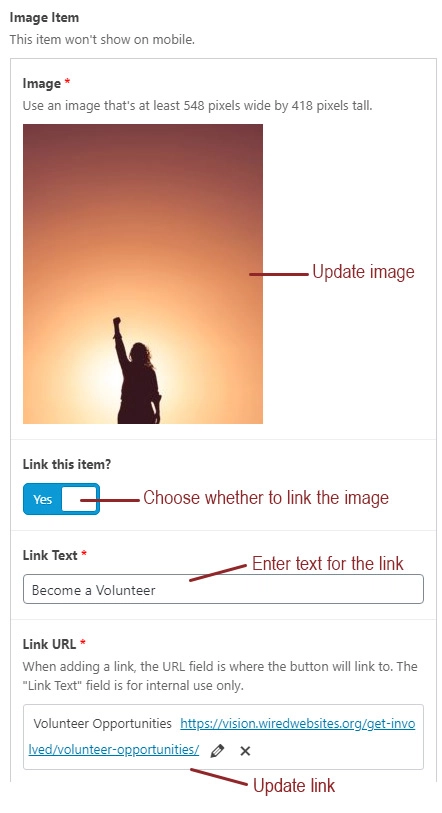
This part of the collage appears as a simple photo with linked text. It will not show up when a user is on a mobile device.
- Image must be 548 pixels wide by 418 pixels tall
- Adding a link is optional. If you select “Yes” to the “Link this item?” question, you’ll be required to add Link Text and a Link URL of the destination.
Click the blue Update button when you’re ready to save your changes.
Edit the Impact Statement Section
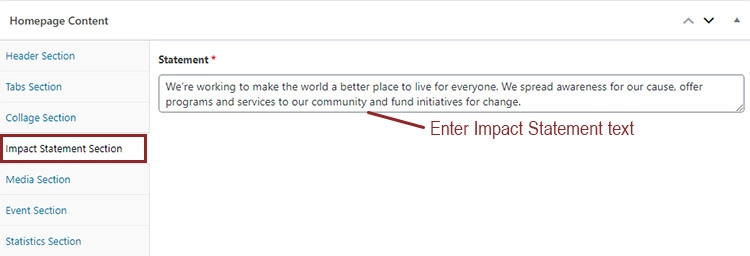
The Impact Statement section is a required area of large text that appears below the collage. You can use it to display information like your mission, vision, values or other text.

Simply add your text into the Statement field. There are no formatting options for the text itself (such as bold text or adding links), and we suggest keeping the overall length to two sentences or less. Click the blue Update button when you’re ready to save your changes.
Edit the Media Section
The Media section is a place to feature a strong video or image. It will display directly below the Impact Statement section. Be sure to click the blue Update button when you’re ready to save your changes.
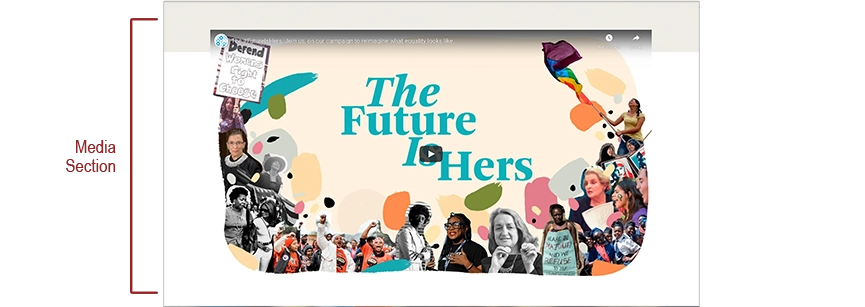
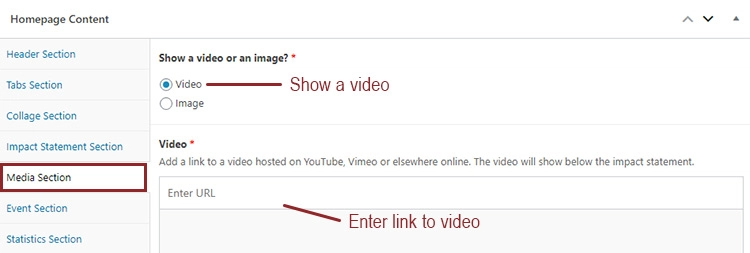
- For a Video, you’ll need to add a link to a video that’s hosted on YouTube, Vimeo or elsewhere online.
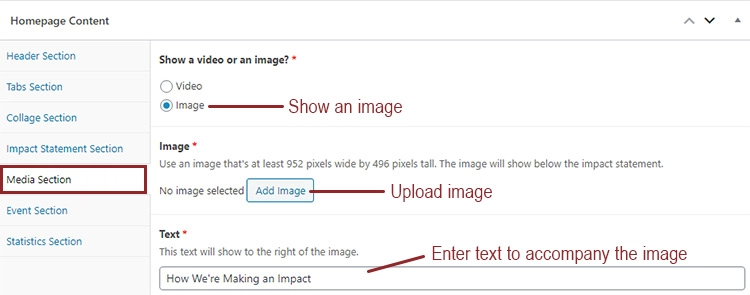
- For an Image, select or upload one that’s 952 pixels wide by 496 pixels tall. You’ll be required to add a short line of Text that appears to the right of the image.
Edit the Events Section
FEATURE AVAILABILITY
The Event System is available for Grow and Amplify plan websites. Change your plan in the Account & Billing section of your website Dashboard.
The Event System is available for Grow and Amplify plan websites. Change your plan in the Account & Billing section of your website Dashboard.
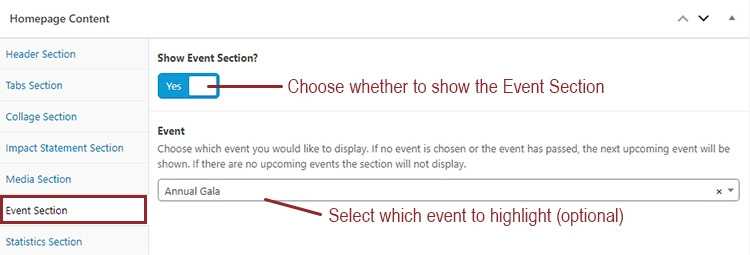
The optional Event section is a place to feature an upcoming event that’s been entered into the Event System. If your site doesn’t use the Event System, or if you decide to hide this section, it won’t appear at all on the homepage.

- Use the dropdown to select a specific upcoming event from the Event System. The event will need to be published before you can select it. Learn more about creating a new event.
- If no event is chosen, or the date of your chosen event is now passed, the next upcoming event will be shown.
- The section will not appear at all on the homepage if there are no upcoming events in the Event System.
- All of the event details, including the title, description, date and location are automatically pulled from the event you created. To change those details, you’ll need to edit the event itself and not the homepage.
Click the blue Update button when you’re ready to save your changes.
Edit the Statistics Section
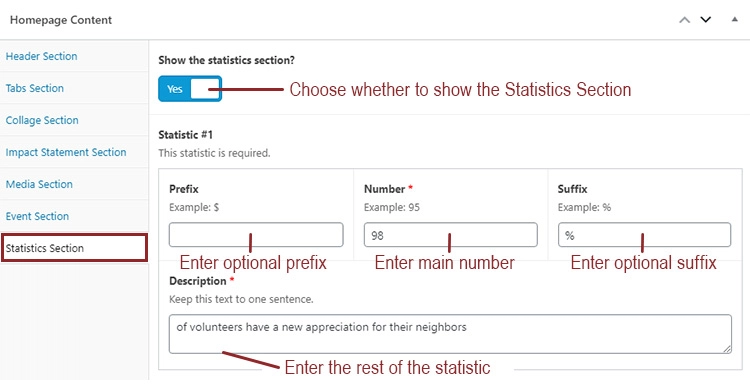
Statistics are a great way to highlight the need for your organization’s services or to demonstrate the impact you have in your community. If you opt to show the Statistics Section on your site, you’ll need to come up with three numbers to share. Be sure the statistics are formatted in such a way that the number displays prominently at the left of the description.

- For each Number, you can add an optional Prefix (like $ or #) and Suffix (%)
- Each Number requires an accompanying text description of one sentence or less.
- All three statistics are required to display this section.
- Click the blue Update button when you’re ready to save your changes.
Still Have Questions?
The quickest way to get support is to reach out to us within your website’s admin dashboard. Log into your website and then fill out the Request Help form. You’ll hear back from us within one business day.