Showcasing upcoming events on your site can be a great way to educate and recruit attendees.
You can easily display a dynamic list of events on the page of your choice using the Events block. You’ll also have the ability to allow your upcoming events to show in the sidebar of your website. Learn more about our event system and see it in action on our demo site.
FEATURE AVAILABILITY
The Event System is available for Grow and Amplify plan websites. Change your plan in the Account & Billing section of your website Dashboard.
Jump Ahead To
- Where Do I Add a New Event?
- How Do I Customize a New Event?
- How Do I Add Events to a Page?
- How Do I Remove An Event?
Where Do I Add a New Event?
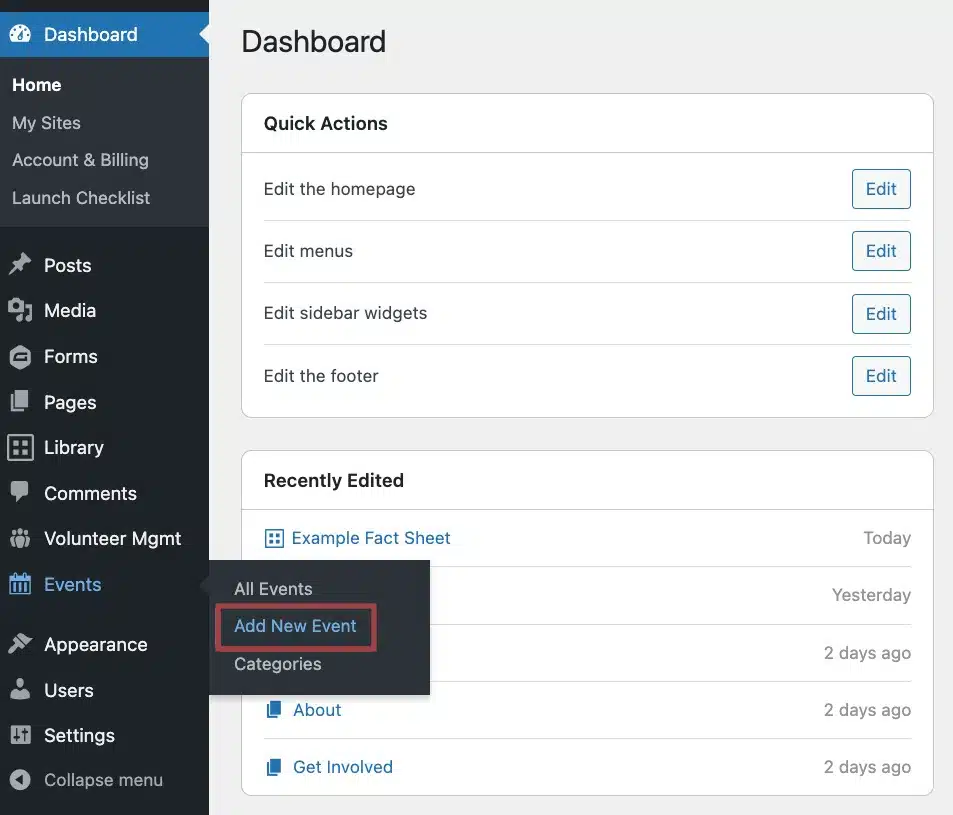
There are two easy ways to access your website’s event system. First, log into your website. From the Dashboard, look in the admin menu on the left-hand side and find the Events item. You can automatically add an event by clicking “Add New Event” in the drop-down menu.
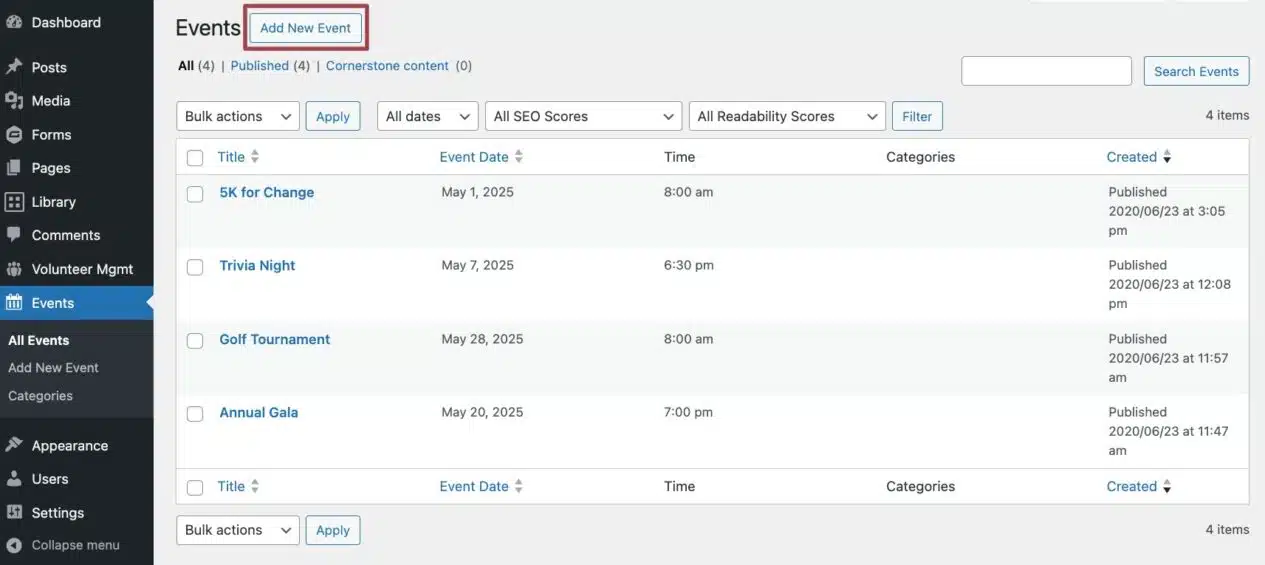
If you find yourself on the “All Events” page, either by selecting it intentionally in the drop-down menu, or landing there by clicking the overarching “Events” item in the sidebar, you can add an event by simply clicking “Add New Event” next to the Events page title.
How Do I Customize a New Event?
At first glance, the New Event page looks similar to a standard page, but there is some additional information you’ll need to provide to make sure your event is set up properly and shows helpful details throughout the site.
Event Information
- Add a title for your event.
- Include any helpful information about your event in the large editor area below the title.
- Consider adding a summary of the event, where to park, age requirements for registration, etc. There are dedicated spaces for location, date and time that we’ll show you later in this article.
- You can use different blocks here for text, images and video like you would when formatting a page.
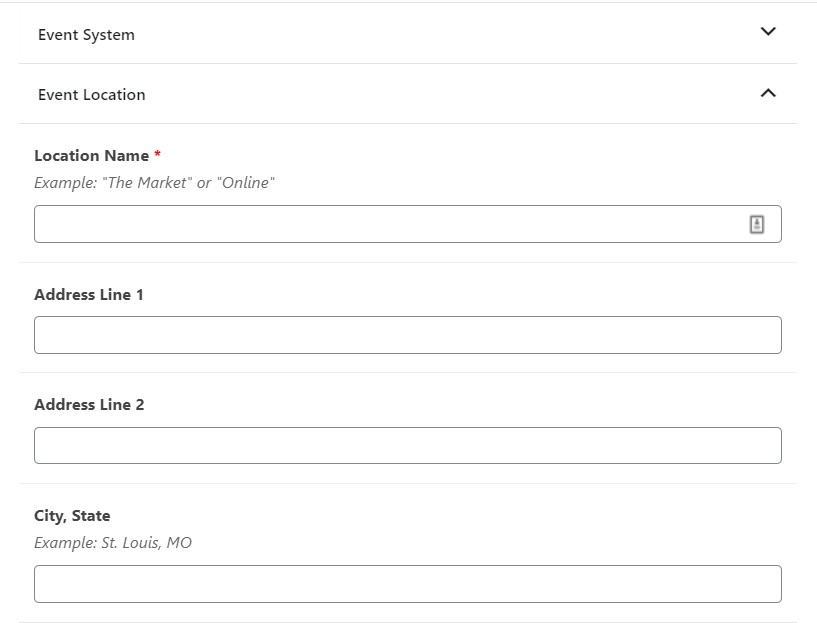
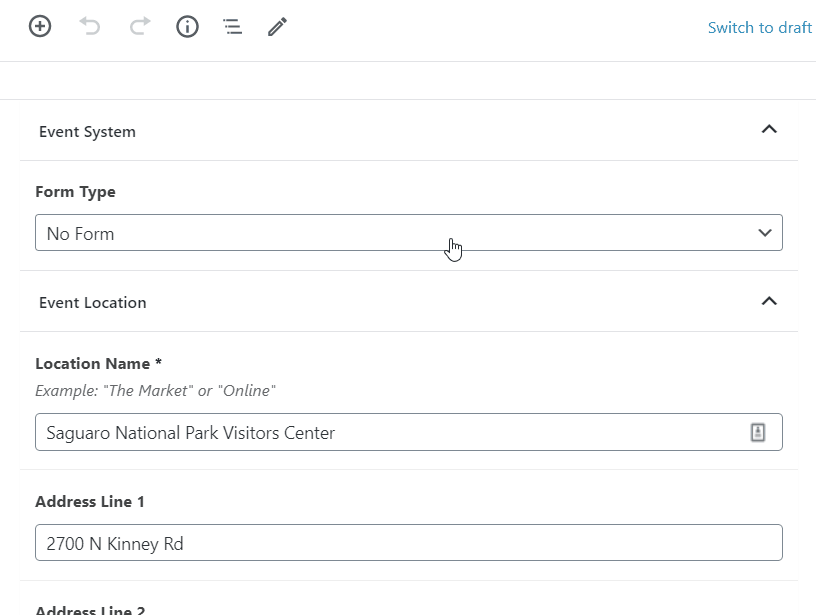
- Note the location of your event, including the name and address in the “Event Location” section. If the event is virtual, you can put “Online” in the location field. You don’t need to fill in the “Address Line” and “City, State” fields.
- On Airy and Chroma, the “Event Location” section is not available yet. If you’re using one of those themes, you can add the location details to the content area of the event.
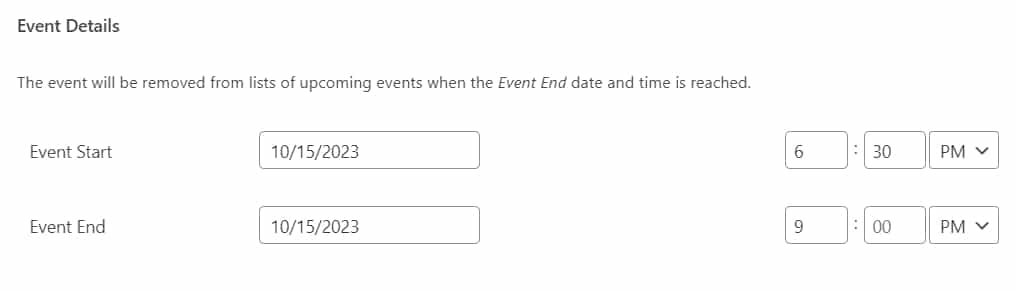
- Add the date and time of your event in the “Event Details” section below the location. The event will automatically disappear from lists of upcoming events throughout your site when the Event End date and time is reached.
Selecting the Event Registration Form
- In the “Form Type” drop-down menu at the bottom of the page, decide on the type of form you’d like to include. You can select and fill out the prompted information for:
- No Form
- Free Form (Can gauge how many people will attend, but won’t collect money via the website)
- Paid Form (Collects an attendance fee for your event, as well as attendee information.)
- Custom Form (If you need to collect information that’s not included in the pre-made forms, you can create a custom event registration form that collects the information you need.)
The Free and the Paid forms are premade, and you won’t be able to modify their fields.
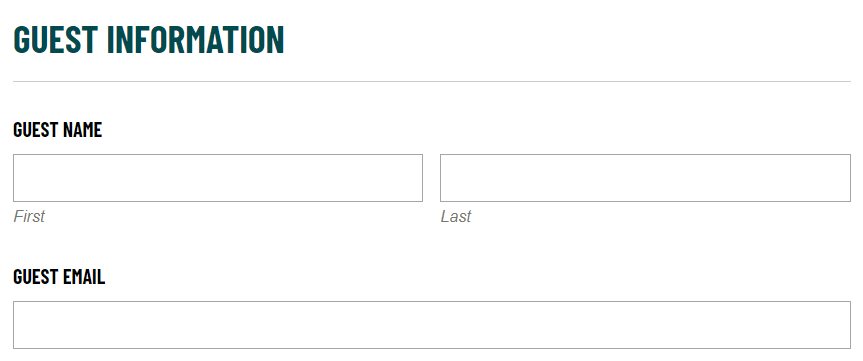
You have the option to allow people to register additional guests for the event. The form will automatically add Name and Email fields for each guest, and once they’re registered, they’ll receive an email notification.
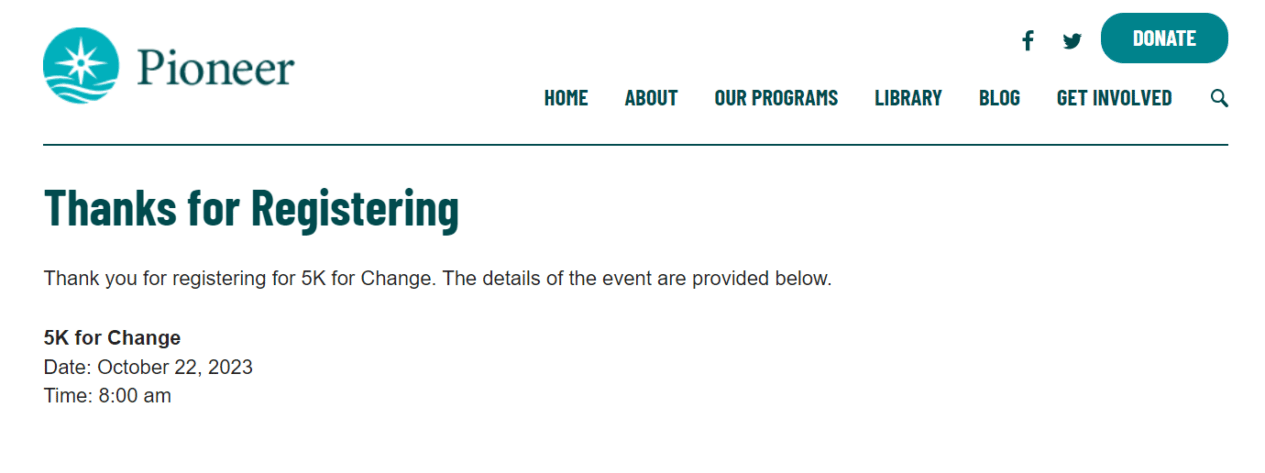
Customizing the Thank You Page Content
You can add a custom message to show on the thank you page for each event. The information you include in that section will be shown to users after they register.
By default, there’s some text with basic information about the event, which you can modify as needed. The tags like {Event Title}, {Event Date} and {Event Time} will be automatically filled with the real event information.
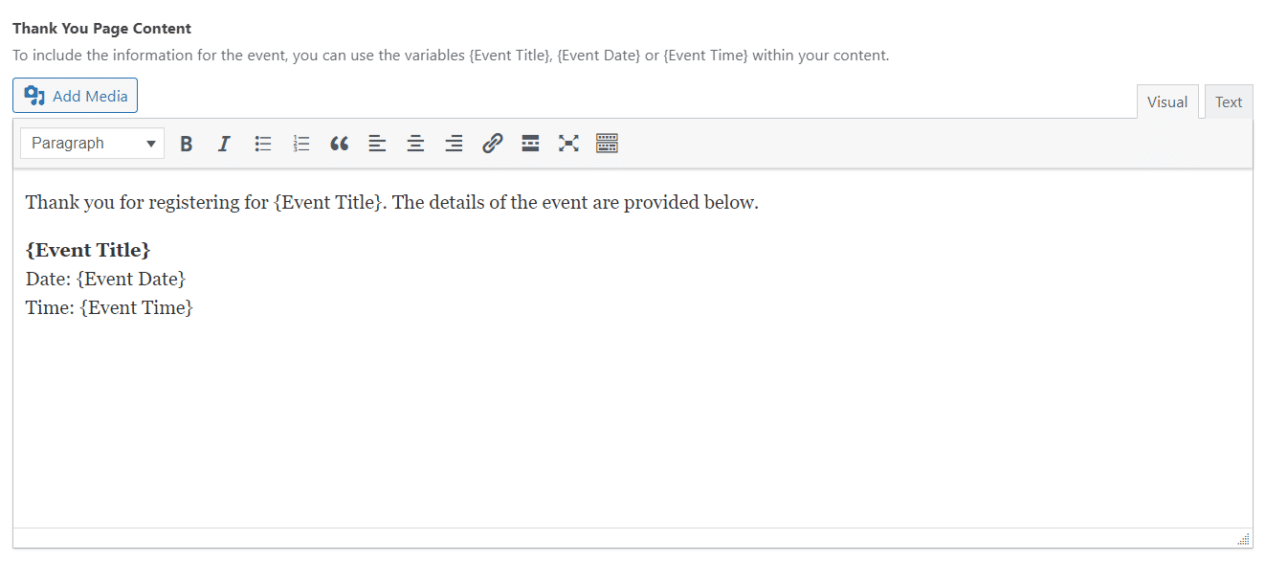
A single default form can be used for multiple events. You can customize the thank you page for each event differently if you want to display specific information (such as parking instructions, schedules, resource links, etc.).
Email Notifications
People who have registered for an event (and their guests) will receive an email notification with the event’s details, and the information the submitter included in the form. If you allow users to register guests, then the details you’ve added to the Thank You Page Content section for this event will be shown to guests in their email notification.
Adding Categories
- Events can be grouped together in categories to highlight different types of events, such as virtual, public or local events, on different pages of your website. To add an event to a category, select the category you’d like from the “Categories” Document settings on the right.
- To create a new category for the event, click the “Add New Category” text link. Fields for a category name and parent category (which allows you to group a new category within an existing category) will appear.
- Enter a name for your new category and click the button to “Add New Category”. Your new category will be available at any event on your website.

Featured Image
- Like other pages on the site, you can choose to add a featured image by clicking the “Set featured image” button in the Document settings on the right side of the screen.

Creating Recurring Events
The event system doesn’t currently support automatically recurring events. If you have an event that happens regularly, we recommend creating a new event for each occurrence. Copy and paste the information into each event, set the form type and change the date as needed.
How Do I Add Events to a Page?
Once you’re finished building out your Events, you’ll want to add them to the page. You can do this by adding the Events block.
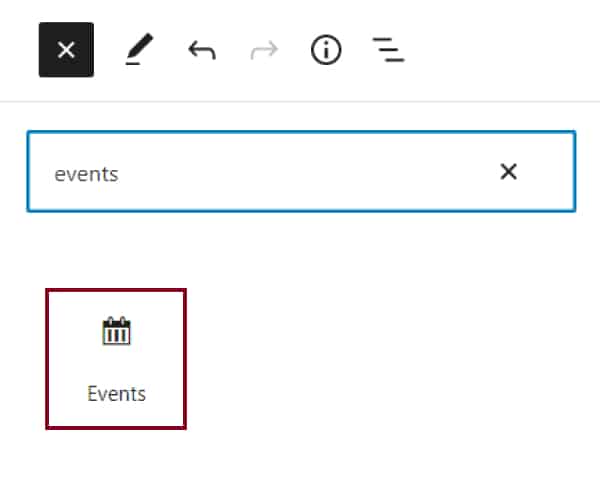
- Go to the page you’d like to showcase the events on.
- Click the (+) symbol in the upper left corner and search for Events.
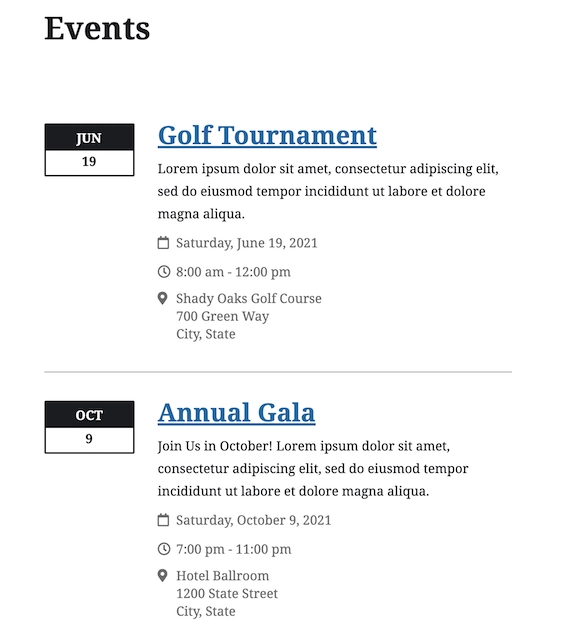
- Once the block has been added, this will automatically pull in the event information that you’ve added with the Event system.
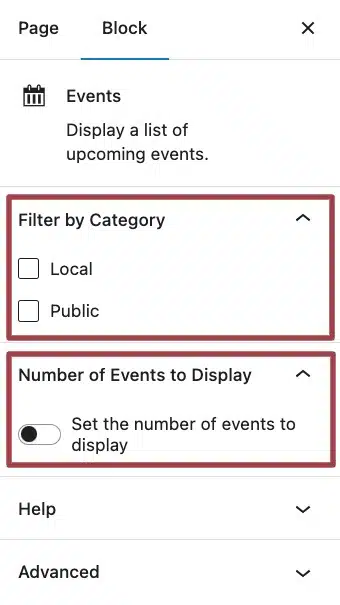
- On the right side of the screen, under the Block settings, you have the option to filter by category as well as set the number of events. Filtering by category allows you to choose the category of events that should be shown in the block, whereas setting the number of events allows you to choose the number of events to display within the block.
- Make sure you preview your changes. Once everything looks good, push your changes live by clicking the blue Publish button in the upper right corner.
How Do I Remove An Event?
Once an event passes, it will automatically be removed from the Upcoming Events list. Your site visitors will no longer see it, but you will still be able to access the Event’s information in the back end of your site, as needed. For this reason, there’s no need to remove past events from your website.
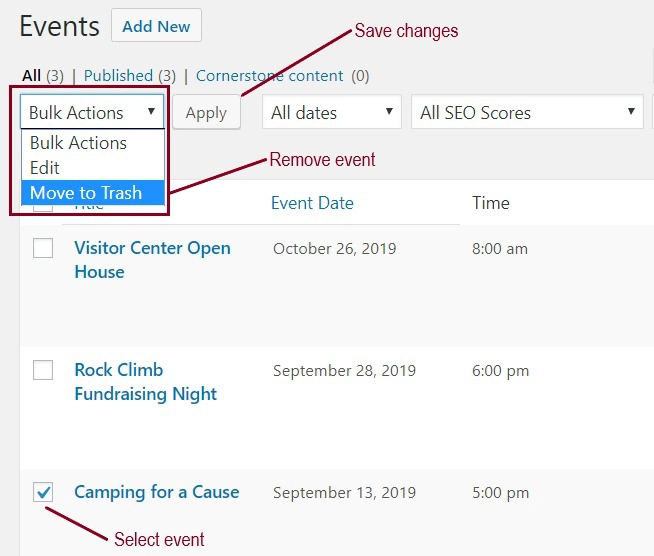
However, to completely delete an upcoming event from your site, click on “All Events” in the Events drop-down menu within the vertical navigation menu on the left side of your dashboard. You’ll then find yourself with a list of all the events on your site.
To remove one or more:
- Click the check box for the items you wish to remove.
- Click the drop-down at the top of the page called “Bulk Actions”
- Select “Move to Trash”
- Click the Apply button
Voilà! Your event(s) will be completely removed from the site. If you’d like to send visitors to a different page or event instead, don’t forget to create a redirect for the event page.
Still Have Questions?
The quickest way to get support is to reach out to us within your website’s admin dashboard. Log into your website and then fill out the Request Help form. You’ll hear back from us within one business day.