Did you recently delete a page or post on your website? Or maybe you need to set up a vanity URL for a print marketing campaign you have coming up?
Redirects are great for sending visitors from an old, nonexistent or shortened URL to a real page on your website. It’s a best practice that prevents people from landing on dead or error pages, instead sending them to helpful content.
FEATURE AVAILABILITY
Only users with an Administrator role can set up or manage redirects on your website. Other roles do not have access to manage redirects. Learn about website roles and access.
In this support article, we’ll walk you through how to add and manage redirects to your website for a variety of different reasons:
- When Should I Set Up a Redirect?
- Create a Redirect
- Redirect a Deleted Piece of Content
- Bulk Redirects
- Manage Your Redirects
Helpful Terminology
- On a website, redirection or a redirect occurs when visitors are sent to a page or URL other than the one they request.
- A permanent redirect is a redirect put in place to prevent error pages, such as when content is deleted from your site.
- In the context of redirects, the source URL is the link the visitor types into their browser. This is the link you want to redirect from.
- The target URL is where you want the visitor to actually land. It’s the final destination.
While there are various other types of redirects that exist on the web, this support article covers permanent redirects, also known as 301 redirects.
When Should I Set Up a Redirect?
There are situations where a redirect needs to be set up manually and others where the redirect is automatically handled by the system. Here are the most common ones:
You need to manually set up or enable a redirect when:
- You want to create a vanity URL for a page. Vanity URLs are shortened, easy to remember versions of a longer URL. For example, if the URL of your donation page is very long (yournonprofit.org/get-involved/ways-to-give/donate-online), you can create a vanity URL to make it shorter (yournonprofit.org/donate), without altering your website structure.
- You delete a published page or post. For example, if you were to delete a page for a conference you no longer hold, you might send visitors who click on that link to your main Events page instead.
- When you delete a live page, a redirect is automatically created — but it’s disabled by default. You’ll need to review it, choose the best destination and enable it. Here are step-by-step instructions.
- You need to redirect multiple pages to go to one page on your website. For example, if you delete a whole section of your website or launch a new website for one of your programs.
- If you need to redirect a large portion of your site to one specific page, please reach out to our team through the Request Help form in the dashboard of your website. We can set these up for you.
Redirects are automatically set up when:
- You change the URL of a live page. Let’s say you adjusted the URL of your Contact Us page from /contact-us to /get-in-touch on your page settings. In this scenario, a redirect will be automatically created.
- You change the URL of a live page with subpages. For example, if you change your Programs page from /programs to /what-we-do on the page settings, the system will create redirects automatically for any subpages of Programs.
Create a Redirect
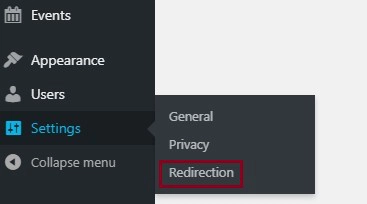
To create a redirect for your website, start by logging into the back end of your website and going to Redirection under Settings in the admin menu on the left.
- Click the “Add New” button at the top of the page.
- Fill out the “Source URL” field. Read more tips for configuring a source URL.
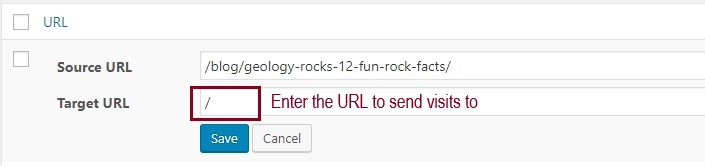
- Enter the URL you would like to send your visitors to instead within the “Target URL” field. You can either paste in the full URL or begin typing the page name and select the option you would like from the drop down menu that appears.
- Click the blue “Add Redirect” button. Your new redirect should appear at the top of the list.

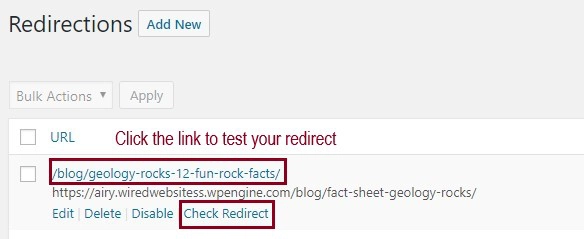
- To test your redirect, click the blue source URL that you entered. It should take you to the target URL that you entered, visible in gray on the line below.
- You can also click the “Check Redirect” link that appears when you hover over the specific redirect within the list.
Configuring a Source URL
There are a few things to keep in mind when setting the source URL for your redirect.
- Leave out the domain name (https://yournonprofit.org) and begin with the forward slash after it (/vanity-url). The tool will configure the domain for you.
- This field is case-insensitive, meaning visitors will be sent to the same page whether they use capital or lowercase letters. You’re free to use your preference (lowercase, uppercase or a mix of the two) within vanity URLs.
- The redirect will work when the URL finishes with or without a trailing slash (/), so there’s no need to create separate redirects for each variation.
- It’s not possible to redirect certain types of files (like PDFs or Word Documents) stored within your website’s media library. If your source URL starts with /wp-content/, you will see an error and the redirect will fail when tested.
Add a Redirect for Deleted Content
When you delete or “trash” a published piece of content, such as a page or post, you’ll see a notice suggesting that you set up a redirect. Whenever published content is trashed, a disabled redirect is automatically created.
To ensure we’re sending visitors to the correct page on your website, the system will disable the automatically generated redirect once it’s created so you can edit and enable it. This way, you won’t need to remember the URL for the page that you deleted. You’ll just need to decide where to send visitors looking for that content.
To edit and enable the redirect:
- Click the link in the notification to “set up a redirect” or go to Redirection under Settings in the admin menu on the left.
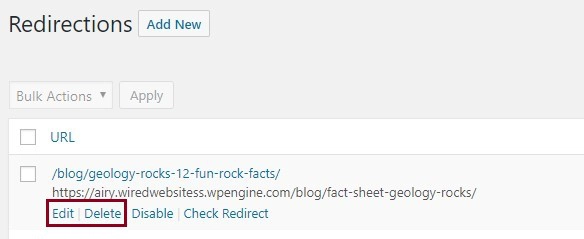
- Find the automatically generated redirect for the piece of content you trashed within the list. If you just deleted it, it should be the first redirect in the list. Since it’s disabled, it will also have a strike through it.
- Hover over the redirect and click “Enable”.
- Edit the target URL to be the URL you’d like visitors to be sent instead of the deleted page. You can either paste in the full URL or begin typing the page name and select the option you would like from the drop down menu that appears. The default option is your homepage.
- Click the blue “Save” button.
Managing Your Redirects
Once you create a redirect, you can disable, enable, edit or delete the redirect at any time. If you had a website before we launched your Wired Impact site, there will likely already be redirects on your site, even if you’ve never created one yourself. It’s part of our typical launch process to make sure that visitors to pages on your previous website don’t land on error pages.
View your full list of redirects within Redirection under Settings in the admin menu on the left.
Edit a redirect
You might decide down the road that you’d like a deleted page or post to go to a more relevant new page instead of sending people to a more general page like your homepage. Or, maybe the page you’re redirecting people to no longer exists itself. No worries! To edit a redirect, hover over it in the list and click “Edit”. From there, you can adjust either the source or the target URLs to fit your needs.
Remove a redirect
By clicking “Delete”, you can remove that redirect. But be careful about removing redirects! Once the redirect is deleted, visitors typing in the source URL could land on an error page if that URL does not exist as a published page or post on your website.
Still Have Questions?
The quickest way to get support is to reach out to us within your website’s admin dashboard. Log into your website and then fill out the Request Help form. You’ll hear back from us within one business day.