When you first get your hands on your nonprofit’s new website, a user will already be created for you. As an administrator, you can add additional users to your website.
Maybe you have another team member who needs full access to the site’s back end. Or maybe you have someone who only plans to write blog posts for your organization but doesn’t need access to everything. Great news! There are user roles for these scenarios and more. Later, if you need to remove or delete a user, you can do that, too.
User Role Options
The following user roles are listed in order of the amount of access they’ll have to your website.
Administrator
An Administrator has access to all the administration features and can update pages, blog posts, events, volunteer opportunities and any other settings throughout the website.
Here are a few specific things that only someone with an Administrator role can do:
- Access the “Appearance” section, which houses the widgets options for sidebars and the site customizer.
- Build forms and access entries since forms can be used to collect sensitive visitor information.
- Create and manage redirects.
- Update the Privacy Policy page.
Editor
An Editor can publish and manage content authored by other users. This role is great for someone who needs to edit information throughout the site, including page content, events, volunteer opportunities
Author
An Author can publish and manage their own posts and events, including responding to comments and adding media like photos and downloadable files. This role does not have the ability to edit content authored by other users. If someone at your organization only needs to be in your website for blog post writing purposes or creating new upcoming events for the site, this might be a good role for them. Read more about adding guest authors.
Contributor
A Contributor can write and manage their own posts and events but cannot publish them or add media such as photos or downloadable files. They also cannot create or edit volunteer opportunities or pages of any kind. You might give an intern or guest blog post writer this level of access if you want someone else to review and approve their content before it gets published on the live site.
Subscriber
A Subscriber can only manage their own profile. They can also read and comment on published posts but cannot write or publish their own posts. This role is often used when you want to restrict an individual from making changes to the site without removing their user altogether.
You may see some other role options when you add a user, but you’ll want to focus on assigning one of the five roles listed above.
How Do I Add a New User?
There are a few ways to create a new user for your website. All require you to be logged into the back end of your site. The following is the easiest way to add a new user:
- When you log in, you’ll be looking at your site’s dashboard. In the left-hand admin menu, hover over the “Users” item and click “Add New”.

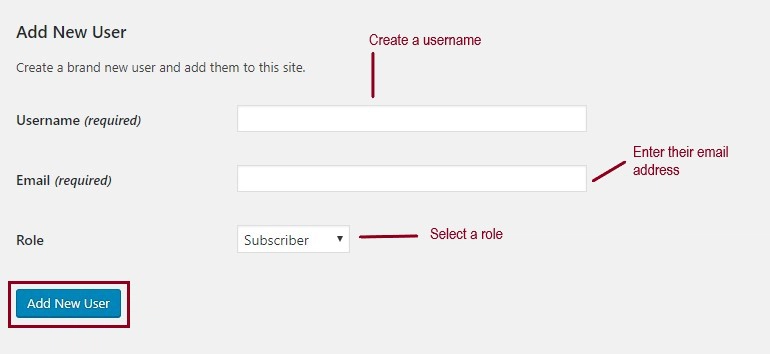
You’ll be taken to a new screen to fill out the new user’s information. Skip down to the section heading that says “Add New User”.
- Create a username for the user. This cannot be changed later. Choose something that will scale with the rest of your organization, like first initial and last name. For example, John Camper’s username would be “
jcamper ”. We recommend using all lowercase letters. - Enter their existing email address.
- Select the role you’d like for them to have. You can edit this at any time.
- Click the blue “Add New User” button.
The user will be sent an email to the email address that you’ve listed, asking them to confirm the account. If they don’t see the email in their inbox, ask them to check their spam or junk folder.
Once they’ve clicked the confirmation link, their new user profile will be created.
Follow best practices for user security
To keep your website secure, our support team is unable to add new users on your behalf. The best approach is to ask an existing administrator to follow the above instructions to add a new user.
If your website administrator has left the organization, you’ll need access to their email address. From there, follow these steps to reset the password and log in. Once you’re logged in, you can create a new user for yourself and take any other steps needed to transition to a new website manager.
Add or update user information
Once the user is created, click back to “All Users” in the left-hand admin menu under the main “Users” link.
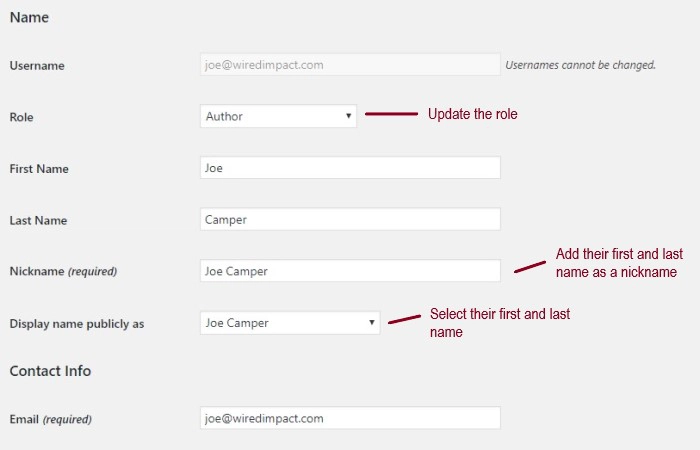
You can then add additional details for the user. Click on their username to open their full profile.
- You’ll see a long list of form fields you can fill out. You don’t need to fill out most of these.
- The main items to update are the “First Name”, “Last Name”, “Nickname” and “Display name publicly as” fields so their name displays properly across the site. Otherwise, their shortened username will automatically be used.
- Be sure to click the blue “Update Profile” button at the bottom of the page to save your changes.
How Do I Delete a User?
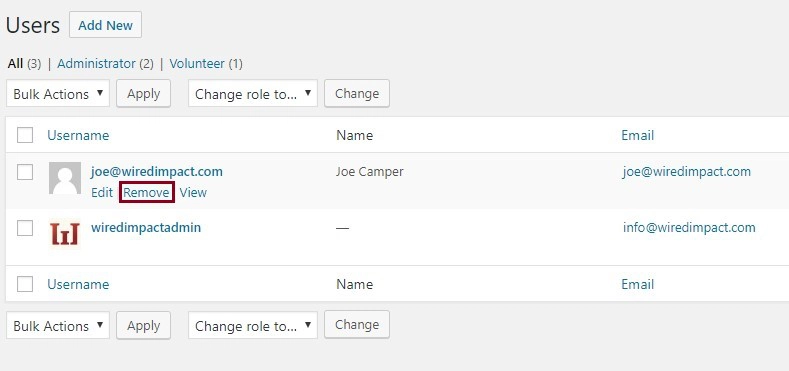
To remove a user, click on “Users” from the left-hand admin menu. Hover over the user you’d like to remove, and you’ll see a few links pop up right below their username. Click “Remove”. You’ll have to click one more button to confirm the removal, and you’re set.
Still Have Questions?
The quickest way to get support is to reach out to us within your website’s admin dashboard. Log into your website and then fill out the Request Help form. You’ll hear back from us within one business day.