Emailing volunteers through the volunteer management system allows you to track correspondence and keep them updated as the event nears. Plus you can easily send a thank you note after the fact, letting them know how grateful you are for their time. In this article, we’ll walk through how to send emails to volunteers using the Volunteer Management system.
In this article, we’ll guide you through the process of sending emails to your volunteers using the volunteer management system. If this is your first time reaching out to your volunteers via email, it’s essential to review and customize a few settings to ensure they align with your organization’s needs.
FEATURE AVAILABILITY
The Volunteer System is available for Amplify plan websites. Upgrade your plan in the Account & Billing section of your website Dashboard to unlock this feature.
Helpful Terminology
- A website form is anywhere a user can enter information in fields, which is then stored in the website’s database and can be viewed in the back end of the website.
- Individual form fields gather up specific information, like name, address or contact information.
- When sending emails from your website, variables are terms housed within brackets that allow you to personalize emails, using the information provided when a form was submitted. For example, the variable {contact_name}, will be replaced with the volunteer’s name when an email is sent.
Where Can I View Volunteers for a Specific Opportunity?
In order to email volunteers using the volunteer system, you’ll need to have at least one volunteer sign up for the opportunity using the form on the website.
Once a volunteer has signed up, you’ll be able to view their information by:
- Logging in to the website
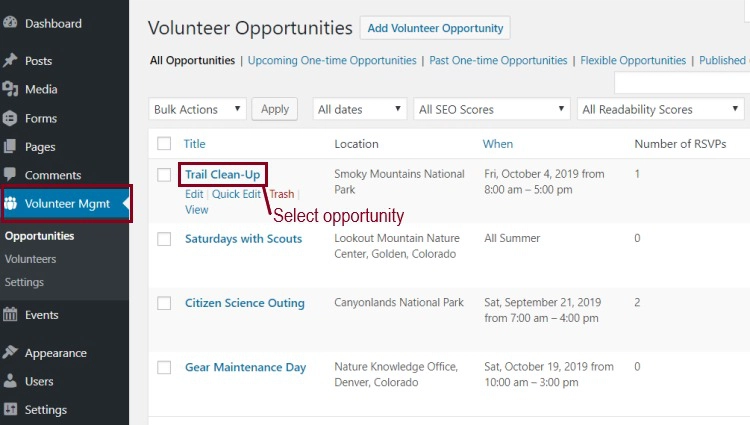
- Going to Volunteer Management and selecting Opportunities
- Clicking on the specific opportunity name you’d like to work with
The name and contact information for registered volunteers will appear beneath the details of the opportunity, under the “Volunteer Opportunity RSVPs” heading near the bottom of the page.

Here you’ll see a list of everyone who has signed up for the volunteer opportunity by submitting this form on your website. To view more details about a volunteer, select the linked volunteer name.
Sending a Volunteer Email
To send an email to registered volunteers, you’ll need to:
- Log into your website and find “Volunteer Mgmt” in the admin menu on the left side.
- Hover over “Volunteer Mgmt” and select “Opportunities”
- Select the opportunity you’d like to work with from the list of all opportunities

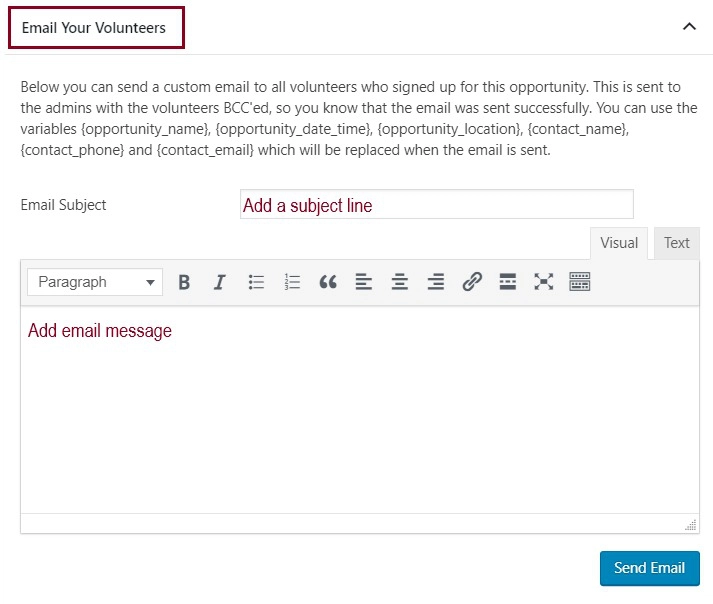
To send your first email, scroll down past the opportunity details section to the “Email Your Volunteers” heading.

You can follow these steps to build out the content of your email:
- Add the subject line of your email to the Subject Line field. You can use the {opportunity_name} variable to add the opportunity name to the subject line.
- Add the content of the email to the text editor. You can add a greeting using the {contact_name} variable and use the {opportunity_date_time} and {opportunity_location} variables to remind volunteers about the details of the opportunity.
- Use the formatting options to style your email as needed.
Once you’ve written and reviewed your email, hit the blue “Send Email” button to send it to your volunteers.
How Can I View Past Emails?
Every email sent to volunteers for a specific opportunity can be seen by logging into your site and viewing that opportunity. Scroll down past the opportunity details section to the “Emails Sent to Volunteers” heading.

Still Have Questions?
The quickest way to get support is to reach out to us within your website’s admin dashboard. Log into your website and then fill out the Request Help form. You’ll hear back from us within one business day.